Rick's b.log - 2009/03/28
You are 18.219.201.167, pleased to meet you!
Rick's b.log - 2009/03/28 |
|
| It is the 19th of February 2025 You are 18.219.201.167, pleased to meet you! |
|
mailto: blog -at- heyrick -dot- eu
Okay... assuming the parts of the video file are already in XviD/MP3 format, specifying a frame rate of 29.989fps, we can start the process...
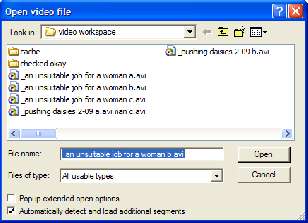
For this example, I shall be using a recording of "An Unsuitable Job For A Woman" (broadcast on ITV3; I got it from ITV3+1 because of a schedule clash otherwise). It is in three parts, suffixed a, b, and c accordingly.
When the first file is loaded, skip around to satisfy yourself that it plays correctly.
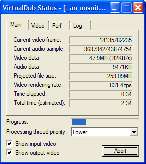
Now if you look at the frame rate, you will see that it is indeed 29.989fps but the audio track is a slightly different length. This will throw off anything that follows, so we must now correct for this. It's a shame VirtualDub does not have an option to force the audio and video lengths to be identical (if it has, I've not found it...).
Now leave this alone and go to the end of the current video file, that's this button:
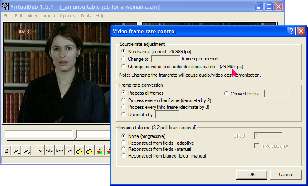
Now open the File menu and choose Append AVI segment, and load in the second part:
The current position marker will have shifted. It is still at the end of 'part one', which is perfect for working out the audio sync in the second part.
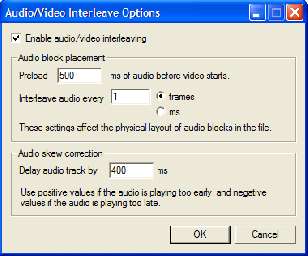
Play a few sections, look at the speech as well. Does it all fit? The maths and timings above indicate a displacement of 600ms, however I found 400ms to be a better match. I don't have an explanation for this. The PVR physically stops recording after every hour, and restarts with a new file. You can expect to lose a few seconds of recording while this is happening. Yes, it is annoying, but on the flip side the jump-cut allows us to sneak in an audio join as well.
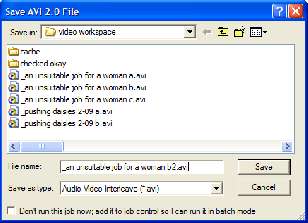
Now, here's the trick. We have loaded part b on to part a, and set the audio skew. This won't work as settings apply to the entire file being processed. So load (not append) part b on its own, and as soon as you have done so, save it as part b2.
As we are performing a direct stream copy, there isn't much processing going on. We are reading the video and audio stream, and just writing the exact same thing back with a new audio offset. The limiting factor here is likely to be your harddisc's sustained transfer rate, plus your FSB (how quickly your computer can shift data around internally).
If you have a third part, repeat the process for the third part.
This will leave us with the following files:
I know this is kinda complicated. It isn't really, it's just fiddly and a bit annoying. I think, again, we are suffering from digital video being separate audio and video 'streams' which are only related to each other insofar as the starting time and duration ticker. In a way this is no different to previous methods, the linear sound stripe on Super8 ciné film, or the audio track on a VHS tape, or even the sound encoded into the film projected at your local cinema. The prime difference is that by virtue of the media employed, the two were implicitly joined. As anybody who has ever tried to digitally record a video of a poor analogue signal will know, the frame rate is all over the place. It is extremely difficult to record that correctly using digital methods and domestic equipment. But try as you might, the videotape will always look and feel correct because that bit of videotape is passing that playback head at exactly that instant. Ditto for ciné. This is very much not the case for computer video where we have two 'streams' (a picture bit and a sound bit) which are in different formats, and are accordingly played by different codecs working in different threads. If you don't understand the geek, think of it as two separate programs working together side by side. One hoiks out the bits of the video stream and splats a picture on to your monitor. The other hoiks out the sound information and sends the result if its efforts to your soundcard.
More in depth video conversion
With the iPod recorder PVR, recording a 25fps PAL signal, there are three possible states of play (your mileage will vary with other PVRs/input signals):
In this case, simply cut out the adverts and glue the pieces together.
or
The frame rate is very close to what it should be - like 29.990fps, etc.
In this case, the parts will need to be joined with a little bit of resyncing of the audio. This document explains how to perform such an operation.
The solution is to take each little part in turn, selecting and saving as a separate video file, with appropriate audio correction for each, so that the final result may be the sum of all of the pieces joined together.
This should be done at the initial MJPEG->XviD stage.
You are likely to find that advert breaks throw in an offset (which, oddly enough, often seems to be 1200ms).
On the other hand, I had a half hour 'comedy' programme which broke down to 22 pieces. In the end I decided it wasn't worth the effort and so I deleted it all. Given the number of repears in TV, don't feel you must keep something this messed up if there is the easy possibility of trying to record it again.
Load VirtualDub and set both the video and the audio to direct stream copy.
TIP! If you hold down Shift when skipping around, VirtualDub will jump from keyframe to keyframe. This makes the process much faster, especially for those of us with slower computers; otherwise the codec has to work backwards from the specified frame to find the associated keyframe, and then work forwards altering the keyframe picture until it represents the specified frame. On my machine, a 450MHz system, frame step forwards is okay. Frame step backwards, or a jump to an arbitrary framne, can take as long as five seconds.
![]()
The simplest way is to look for a distinct sound, like a door slam or a gunshot. Then play around that area so that you hear or see the action (whichever occurs first) and count off in your head roughly how long it takes until the sound or picture (whichever is opposite) is experienced. Now STOP, go to the Audio->Interleave menu option and down the bottom of the window you will see an audio skew option. Enter here the time, in milliseconds. Don't be all fancy with stuff like 1287ms. Work in units of about 200 or 400 to narrow it down, then units of 50 or 100 to fine-tune. You'll probably find units of 100 (1/10th second) will be accurate enough.
If you can't hack waiting, this is a perfect opportunity to make a cup of tea.
All that remains is to load part a, append parts b2 and c2, and then save the entire thing as _an unsuitable job for a woman.avi (no suffix, it's the whole thing this time).
Part one, should be okay.
Part two, original.
Part two, with corrected audio.
Part three, original.
Part three, with corrected audio.
The two are, in fact, somewhat unrelated even in terms of timing. The video, in our example, is running at 29.989fps. This means 33346µs per frame. The audio is running at a standard 16 bit 44100Hz stereo (well, actually it is probably 128kbit MP3, but it is expanded to standard CD-like audio), which is around 23µs per sample pair.
This is for our PVR's recordings. For DVD rips, we are probably looking at 25fps (European) or 30fps (American) frame rate, and 48000Hz audio. That's 48,000 samples per second. To 16 bit accuracy (to the result can be a value from zero to sixty five thousand), twice - left channel and right channel. Maybe with a bit of finagling because many DVDs actually offer six channel audio (aka "5.1"). It is probably a testament to our times that we can set arbitrary frame rates and audio sampling rates and the end result, once we've set it all up, will play correctly. But, well, it's the setting up part we still have to perform...
Variations on a theme
Well, what happens if the variations in the sound sync are within the one file as opposed to different files?
The question is not that difficult. You see, you can select sections in the video file (the bits that can be highlighted in blue) and when you save, you save the selected part, not the entirety.
By knowing this, we can now simply chop our one input file into the required number of parts, applying the corrections as necessary.
I understand this might be hard to follow, so here's a diagram which I hope will make it much clearer:

Tip! Once you've sorted and saved a section of video, you can then Delete it so it doesn't get in the way of the next part you plan to process.
No comments yet...
| © 2009 Rick Murray |
This web page is licenced for your personal, private, non-commercial use only. No automated processing by advertising systems is permitted. RIPA notice: No consent is given for interception of page transmission. |