Rick's b.log - 2023/04/23
You are 18.217.237.169, pleased to meet you!
Rick's b.log - 2023/04/23 |
|
| It is the 21st of November 2024 You are 18.217.237.169, pleased to meet you! |
|
mailto: blog -at- heyrick -dot- eu
In my defence, it was dirt cheap. ☺
It is a generic device, the information stuck to the bottom is rather useless really.
It is listed on that site for €49,90 which is more than twice what I paid.
The camera itself is pretty nifty. It's a reasonably sharp picture, the movements are nippy, and it is responsive.
Additionally, it seems to be very random as to whether or not it will record video to the inserted µSD card. Using the older version of the app on my older phone, it sort of does. Using the newer version on my newer phone, it seems that it wants you to sign up for some sort of cloud storage in order to record to a local storage device. Which is crazy, but then I rather suspect that this cameras exist in order to push cloud storage onto people. It's €4,49 a month if paying monthly, or €33,99 a year if paying yearly. That's for recording events. For continual recording, it's €22,99 a month or €179,99 a year... for 30 days storage capacity. What's wrong with the on-board SD card, then?
A full port scan shows that the camera is listening on ports 23456 and 34567. Connecting is met with silence. I've tried various ways of accessing, but nothing seems to work.
Well, I'm not happy bouncing information off China, so let's instead look inside. It was dead easy to open. Four screws underneath and the bottom came off to reveal the pan motor, and the WiFi module that is a Realtek 8188FTV. This is a USB WiFi module. The usual 2.4GHz b/g/n spec.
The top half has a poorly concealed screw which, when removed, allows you to crack it open in much the same manner as a Playmobil or Kinder egg.
In here is the tilt motor, the main board, and a board with LEDs and stuff screwed to the front surrounding the camera lens.
I am not going to strip down the camera unit. While the imager is fun to look at, and my macro facility might even be capable of showing up the Bayer arrangement, it's a real pain in the arse to get it back together without either messing up the focus or getting specks of dust inside. Or, worse, both.
Here's the camera side.
What we can see here, the big chip on the left, is a ULN2803F which is an eight channel darlington transistor array. For switching the motors, no doubt.
Then there's the other side.
The device with the heatsink is the SoC. It's not possible to read what this is without taking the heatsink off, which isn't a great idea.
Below it, the chip with many pins is an IP101GR which is an Ethernet transceiver. The chip with fewer pins is an MX6208 motor controller.
Oddly, there doesn't appear to be any RAM. I'm guessing the SoC must have this integrated?
At the bottom of the board were three holes in a row. I didn't even bother to probe them, I just whacked a three pin header in there and hooked up my serial lead.
Nothing.
So I reversed Tx and Rx.
Ahh, that's better.
Okay. So this tells us a few things. Let's unpack it.
I power cycled the camera (the reset button is, literally, for clearing the settings) and bashed Enter a few times as it was starting up.
This gave me the following:
I sent a question mark, and it replied.
Okay, so let's dump the environment to see if there's anything interesting.
Okay, we have some more hardcoded IP addresses. 193.169.4.x. These are svsreut.ru (SVS Telecom) hosted in Moscow.
The first hack is to try copying the bootcmd, but instead of
To do this:
Do not commit it using saveenv, because, upon
With the kernel loaded as normal, hammering Enter does nothing. There's no login prompt. Giving commands (like
So, power cycle again and back to U-Boot.
Now, the
Let's unpick it.
We can make use of this for our own nefarious purposes. ☺ We can surmise that the memory begins at &80000000. This is because the kernel loads in at &80600000, and earlier U-Boot said the top of usable memory was &84000000.
Well, 8MiB of flash ought to fit into 64MiB of RAM, right?
Let's try it.
I have used the same base address as the kernel loads at. I'm guessing maybe U-Boot or something is below it? Wouldn't be useful to trash ourselves!
So now we have a copy of the entire flash in RAM.
This next part is awfully tedious. One simple command, and around fifty-odd minutes of finger twiddling.
Now let's run the numbers shall we? Each line is around 78 characters to fit into an 80 column terminal. And each line represents 16 bytes of the dump.
Serial is bloody slow, but it is reliable. UBoot isn't overly smart and has very little context of filing systems. I could, if I wanted, dump the Flash to SD card, but by this I mean literally writing it to specific sectors (and to hell with anything that resembles a filing system!).
As the data was being recorded by my phone, I wrote a short (about 50 line) program to load the entire dump into memory and then translate the byte values given to actual bytes to reconstitute an image of what's in the flash.
But... asides from UBoot at the beginning, it is compressed. So not much to do with it at this time.
However, I do now have a copy of the flash contents. There's probably stuff for Linux that can unsquash the partitions. Also, I know that it's possible to drop a different firmware on the device. There appear to be various types available on GitHub. They talk about flashing new things to support loading new firmware from SD card. I'd rather see if there's a way to use U-Boot to get that running without flashing, in order to determine which of the options applies to this particular camera.
So it's been an interesting day.
Turns out, my Pi2 is running as a device with 128MiB of RAM.
Apparently the firmware can fudge the RAM value under certain conditions. I think it has something to do with Noobs? But it's clearly not working correctly as I have a RISC OS FileCore format device with the bodged in FAT partition (56MB) and only the files necessary to boot present.
I updated to the most recent firmware, and RISC OS, but this didn't help.
So I popped the µSD card into my phone and noted that it said the FAT partition was 56MB. I copied the files off, the reformatted it, and copied the files back on.
It was annoying as I didn't have copies of some of the peculiarities of this machine's setup (the 7" screen), but not the end of the world as most of the stuff was copied across from the main Pi using ShareFS.
However, DiscKnight has an option where if the drive is messed up, you can tell it how big the media is and it'll look for the root directory to rebuild things. This works because while the boot block (that got trashed) is at the start of the media, the root directory and maps are in the middle.
DiscKnight wasn't able to fully repair the disc, but I note I was using a slightly older version (v1.54), so maybe there's something there?
Then I reformatted the µSD card, and did a full format and not just an initialise. I used SystemDisc to patch in the FAT magic. So I had an empty 16GB device to drop files back on to. Which I did. It took time but it worked.
There's surely no trace of anything that might be tripping up the bootloader. The media was quick formatted by Android and long-formatted (every track) by HForm under RISC OS.
And still this bloody thing says it's a 128MiB machine.
It's just as well it's only the one I use in the living room or outdoors for writing blog stuff or simple programming in the sunshine, as I'm supposed to have around 980MiB free, not flamin' 76MiB!
I've asked on the ROOL forum, but I don't know if there's a fix. A way to tell the bootloader to get it's crap together and behave.
Messing with a cheap 'security' camera
A few years ago. I bought myself a cheap tilt and pan camera. No, not the crappy Foscam clone with the catastrophic security fail, no, a different crappy little IP camera.

The IP camera.
Model information.
The downside, a pretty big downside, is that it is only possible to use it with the associated app (ipc360 on Google). Port scanning the device shows nothing. Attempting to communicate with various typical ports results in connection refused. It appears as if this device calls out to the mothership and takes commands from there, and is only accessible by way of an external server.
There is an Ethernet port, for connection to a LAN instead of using WiFi.
Finally, a USB socket appears to be purely for power. It looks like it goes by way of an AK1844, though I've not found any information on this.
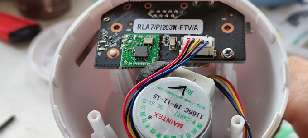
The bottom board.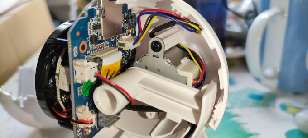
The top part.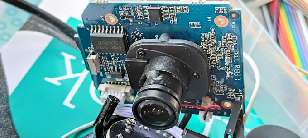
Main board, camera side.
Above it, an NS4158B audio power amplifier.
Not visible in the picture, it's lurking underneath the camera, is a Winbond 25Q64 which is an 8MiB SPI Flash. It's a little eight pin chip.
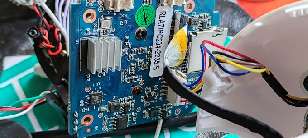
Main board, SoC side.U-Boot SPL 2013.07 (Aug 01 2018 - 14:16:55)
pll_init:365
l2cache_clk = 375000000
pll_cfg.pdiv = 8, pll_cfg.h2div = 4, pll_cfg.h0div = 4,
pll_cfg.cdiv = 1, pll_cfg.l2div = 2
nf=30 nr = 1 od0 = 1 od1 = 1
cppcr is 03c05100
CPM_CPAPCR 03b0890d
nf=42 nr = 1 od0 = 1 od1 = 1
cppcr is 02a04900
CPM_CPMPCR 07d0c90d
nf=50 nr = 1 od0 = 1 od1 = 1
cppcr is 03204900
CPM_CPVPCR 0320490d
cppcr 0x9a794410
apll_freq 712704000
mpll_freq 1000000000
vpll_freq = 1200000000
ddr sel mpll, cpu sel apll
ddrfreq 500000000
cclk 712704000
l2clk 356352000
h0clk 250000000
h2clk 250000000
pclk 125000000
DDRC_DLP:0000f003
U-Boot 2013.07 (Aug 01 2018 - 14:16:55)
Board: ISVP (Ingenic XBurst T20 SoC)
DRAM: 64 MiB
Top of RAM usable for U-Boot at: 84000000
Reserving 445k for U-Boot at: 83f90000
Reserving 32896k for malloc() at: 81f70000
Reserving 32 Bytes for Board Info at: 81f6ffe0
Reserving 124 Bytes for Global Data at: 81f6ff64
Reserving 128k for boot params() at: 81f4ff64
Stack Pointer at: 81f4ff48
Now running in RAM - U-Boot at: 83f90000
MMC: msc: 0
the manufacturer ef
SF: Detected W25Q64
In: serial
Out: serial
Err: serial
Net: Jz4775-9161
the manufacturer ef
SF: Detected W25Q64
reading update.img
** Unable to read file update.img **
update.img not found
reading ssidpw.txt
** Unable to read file ssidpw.txt **
not find file ssidpw.txt
platform:T20L,sensor:2235
bootagrs:console=ttyS1,115200n8 mem=39M@0x0 ispmem=8M@0x2700000
rmem=17M@0x2F00000 init=/linuxrc rootfstype=squashfs
root=/dev/mtdblock2 rw mtdparts=jz_sfc:512K(boot),1600k(kernel),
2816k(root),1536k(user),832k(web),896k(mtd)
Hit any key to stop autoboot: 0
the manufacturer ef
SF: Detected W25Q64
--->probe spend 3 ms
SF: 2621440 bytes @ 0x80000 Read: OK
--->read spend 339 ms
## Booting kernel from Legacy Image at 80600000 ...
Image Name: Linux-3.10.14
Image Type: MIPS Linux Kernel Image (lzma compressed)
Data Size: 1502181 Bytes = 1.4 MiB
Load Address: 80010000
Entry Point: 803a5a40
Verifying Checksum ... OK
Uncompressing Kernel Image ... OK
(Len of pw_cmdline):215,(Len of pw_cmdinfo):224
pw_cmdline:console=ttyS1,115200n8 mem=39M@0x0
ispmem=8M@0x2700000 rmem=17M@0x2F00000 init=/linuxrc
rootfstype=squashfs root=/dev/mtdblock2 rw mtdparts=jz_sfc:
512K(boot),1600k(kernel),2816k(root),1536k(user),832k(web),896k(mtd)
pw_cmdinfo:HWID=0000000000000000000000000000000000000000 ID=
0000000000000000000000000000000000 SSID_NAME=CCTV112
SSID_VALUE=ABCD.01234567 MAC=40:6A:8E:14:DB:FE IP=110.112.119.110
SENSOR=2235 WIFI=8188FTV TYPE=T20L ipncuart=1 ipncauto=1
Starting kernel ...
update.img and ssidpw.txt.
Given the sizes, they'll likely be compressed in some manner, implied by "squashfs".
isvp_t20#
isvp_t20# ?
?
?       - alias for 'help'
base    - print or set address offset
boot    - boot default, i.e., run 'bootcmd'
boota   - boot android system
bootd   - boot default, i.e., run 'bootcmd'
bootm   - boot application image from memory
bootp   - boot image via network using BOOTP/TFTP protocol
chpart  - change active partition
cmp     - memory compare
coninfo - print console devices and information
cp      - memory copy
crc32   - checksum calculation
echo    - echo args to console
env     - environment handling commands
fatinfo - print information about filesystem
fatload - load binary file from a dos filesystem
fatls   - list files in a directory (default /)
gettime - get timer val elapsed,
go      - start application at address 'addr'
help    - print command description/usage
jzsoc   - jz soc info
loadb   - load binary file over serial line (kermit mode)
loads   - load S-Record file over serial line
loady   - load binary file over serial line (ymodem mode)
loop    - infinite loop on address range
md      - memory display
mm      - memory modify (auto-incrementing address)
mmc     - MMC sub system
mmcinfo - display MMC info
mtdparts- define flash/nand partitions
mw      - memory write (fill)
nm      - memory modify (constant address)
ping    - send ICMP ECHO_REQUEST to network host
printenv- print environment variables
reset   - Perform RESET of the CPU
run     - run commands in an environment variable
saveenv - save environment variables to persistent storage
setenv  - set environment variables
sf      - SPI flash sub-system
sleep   - delay execution for some time
source  - run script from memory
tftpboot- boot image via network using TFTP protocol
version - print monitor, compiler and linker version
isvp_t20#
isvp_t20# printenv
printenv
HWID=0000000000000000000000000000000000000000
ID=0000000000000000000000000000000000
IP=110.112.119.110
MAC=40:6A:8E:14:DB:FE
SENSOR=2235
SSID_NAME=CCTV112
SSID_VALUE=ABCD.01234567
TYPE=T20L
WIFI=8188FTV
baudrate=115200
bootargs=console=ttyS1,115200n8 mem=39M@0x0 ispmem=8M@0x2700000
rmem=17M@0x2F00000 init=/linuxrc rootfstype=squashfs
root=/dev/mtdblock2 rw mtdparts=jz_sfc512K(boot),1600k(kernel),
2816k(root),1536k(user),832k(web),896k(mtd)
bootcmd=sf probe;sf read 0x80600000 0x80000 0x280000; bootm 0x80600000
bootdelay=1
ethact=Jz4775-9161
ethaddr=40:6A:8E:14:DB:FE
gatewayip=193.169.4.1
ipaddr=193.169.4.81
ipncauto=1
ipncuart=1
loads_echo=1
netmask=255.255.255.0
serverip=193.169.4.2
stderr=serial
stdin=serial
stdout=serial

Environment size: 784/131068 bytes
isvp_t20#
Given the world today, I'm not sure if that's better or worse than China...
init=/linuxrc, we'll try init=/bin/sh.
setenv bootargs console=blah blah
but instead of going to /linuxrc we'll try /bin/sh.
booting, the kernel loads and the camera immediately reboots.
So either there's some sort of protection in use to prevent tampering, or more likely, /bin/sh just doesn't exist.
ls) does nothing.
bootcmd is important. We can see it says:
sf probe;sf read 0x80600000 0x80000 0x280000; bootm 0x80600000
If we subtract &84000000 from &80000000, and divide by 1024 twice, we get 64. The amount of installed memory.
We know, from the chip ID, that the flash is 8MiB.
isvp_t20# sf probe
sf probe
the manufacturer ef
SF: Detected W25Q64

--->probe spend 4 ms
isvp_t20#
isvp_t20# sf read 0x80600000 0x0 0x800000
sf read 0x80600000 0x0 0x800000
SF: 8388608 bytes @ 0x0 Read: OK
--->read spend 1077 ms
isvp_t20#
The flash offset is zero, the beginning, and the read length is &800000, or 8,388,608 bytes, the expected 8MiB.
isvp_t20# md.b 0x80600000 0x800000
md.b 0x80600000 0x800000
80600000: 06 05 04 03 02 55 aa 55 aa 20 00 00 5c 30 00 00    .....U.U. ..\0..
80600010: 00 00 00 00 00 00 00 00 00 00 00 00 00 00 00 00    ................
[etc for freaking AGES]
This means there will be 524,288 lines output, adding up to 40,894,464 bytes (if 78 characters). That's 39MiB!
But, it gets worse. Our serial link runs at 115,200bps. As the protocol is 8N1, each character takes 9 bits. That means we have a throughput of 12,800 bytes per second. Which means it'll take 3195 seconds to dump the contents of the flash via serial. That's 53¼ minutes.
So go put the kettle on.
Twice.
Doing this may be quicker, but it'll be harder to deal with afterwards. How to read raw sectors from an SD card?
Correction. How to read raw sectors from an SD card when your main machine isn't Linux?
Pi2 fail?
Interesting for several reasons. When I was writing my dump decoder, I wanted to grab a big chunk of memory. It failed.
It was then that I noticed that Android has completely ignored the partition and instead formatted the entire device wiping out the FileCore partition.
Whatever, it did get all my files back so I could copy them all to a USB key.
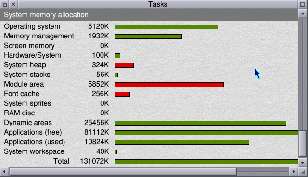
How much memory? How much?
Zerosquare, 24th April 2023, 21:52
You can use Win32 Disk Imager (open-source) to dump the raw sectors of an SD card to a file. You will also need ImDisk Virtual Disk Driver to emulate a drive based on the dump contents, and Ext2Fsd since Windows doesn't support Linux filesystems out-of-the-box.
Good luck!
(small correction: 8N1 means 10 bits per byte, not 9. There's a start bit to account for as well.)Andy S, 26th April 2023, 22:01 KB, 19th October 2023, 21:48
# Webcam hacking how-to
HW: u0_a390, Ingenic T21 SoC, Puwell IPC
## Run on your Linux PC
- Connect to the T21 from your Linux box
```
minicom -D /dev/ttyUSB0 -b 115200
```
## Power cycle the device and stop the boot process by pressing any key
## Run on your T21
```
sf probe
# The flash size is 8388608 bytes, in hex 0x800000
sf read 0x80600000 0x80000 0x280000
# Dump into terminal using serial: (convert text to binary with xxd after)
md.b 0x80600000 0x800000
# Dump using SDCard
mmc rescan
mmc list
# A disk has a fixed sector size, normally 512 bytes, so 8388608/512 = 16384, in hex: 0x4000
mmc write 0x80600000 0 0x4000
```
## Run on your Linux PC
```
# Get the file from sdcard
sudo dd if=/dev/sde of=ingenic_full_fw.bin bs=1 count=$((0x800000)) status=progress
# Analyze file
binwalk ingenic_full_fw.bin
# Carve out root squashfs partition
dd if=ingenic_full_fw.bin of=rootfs.bin bs=1 skip=2162688 count=2637400 status=progress
# Unpack rootfs
unsquashfs rootfs.bin
# Explore the contents
ranger
# Modify /etc/inittab
nano squashfs-root/etc/inittab
# Repack sqfs
mksquashfs squashfs-root/ hacked_root.bin -comp xz
# Compare filesizes and add padding
du -b rootfs.bin
du -b hacked_root.bin
truncate -s 2883584 hacked_root.bin
```
- upload with minicom via ymodem (Ctrl + A , S), at address 0x8.. and baudrate 115200
## Run on T21
```
loady 0x80600000 115200
md 0x80600000 32
# Update the firmware on the flash chip
sf update 0x80600000 0x210000 0x2C0000
reset
# After reboot, enter "root" into the login shell
```
- Setting up the WLAN connection, not working at the moment
```
# List processes
top
# Kill wpa_supplicant
kill 111
# Connect to "test-test", "11113333", setup ip address
wpa_supplicant -B -Dwext -iwlan0 -c /user/etc/wpa_supplicant.conf
ip a add 192.168.0.1/24 dev wlan0
ip addr add broadcast 192.168.0.255 dev wlan0
ip link set dev wlan0 up
```
| © 2023 Rick Murray |
This web page is licenced for your personal, private, non-commercial use only. No automated processing by advertising systems is permitted. RIPA notice: No consent is given for interception of page transmission. |