Rick's b.log - entry 2023/11/11 |
| ||||||
mailto: blog -at- heyrick -dot- eu
You are not reading my b.log using HTTPS. You can switch to HTTPS by clicking here. Printer calculator #2I dug up a Casio HR8A-BK printing calculator. I probably got it at a vide grenier. It's a rather simpler beast than the previous one I talked about.Inside, the printer is an Epson Model-52. Clearly Googling for this is not going to be useful... So let's look inside.
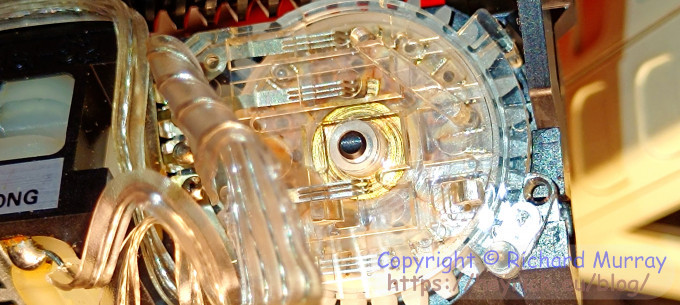
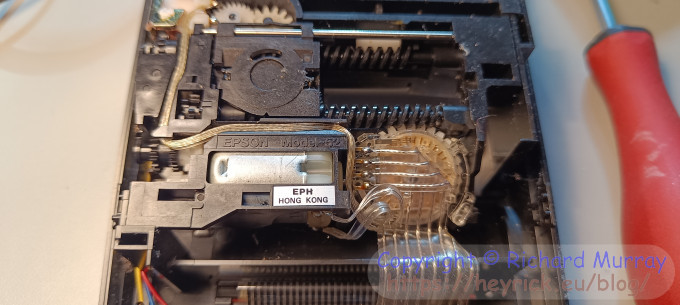 The printer module (underside). As with the previous model, there are eight wires connecting to the printer module. The left two activate the solenoid. The middle four go to a positional sensor. The right two go to the motor. The printer only outputs in black, but it's different in that the print wheels are stacked one atop the other and they rotate sideways.
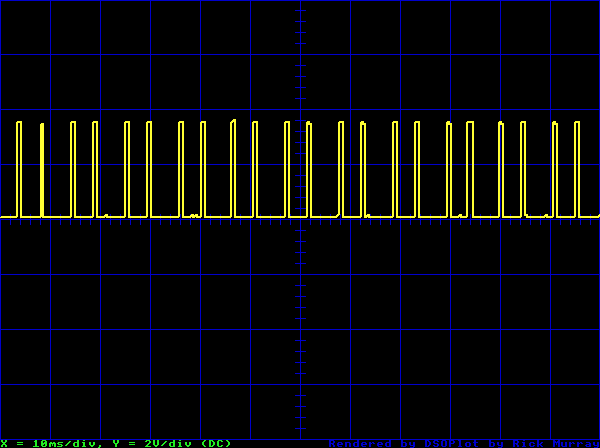
 Close up of the print wheels. The layout of the print wheels are as follows: ⬚ 7 0 8 1 9 2 - 3 , 4 · 5 # 6 R E √ Δ M + C × - ÷ = ◇ ⬚ * % The '⬚' is a space, because like the previous calculator (and probably all of these sorts of devices) it is incapable of moving the head without printing something. When in use, this is the waveform when printing. 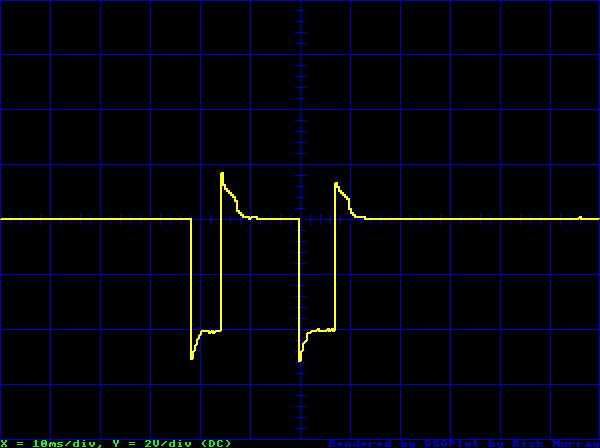 When printing something. And here's the waveform when doing a linefeed. 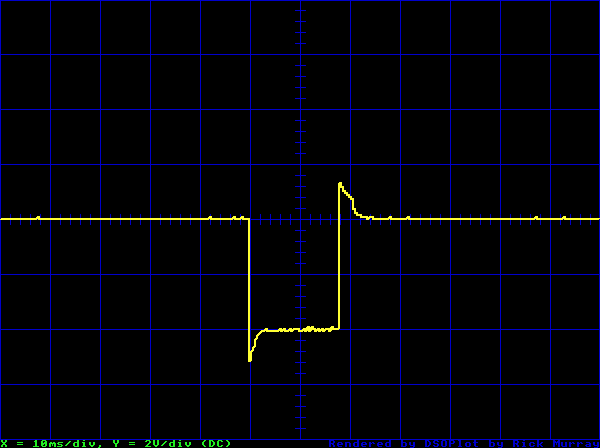 Doing a linefeed.
So, as can be seen, printing activates the solenoid for 6 milliseconds, and shortly after for 7 milliseconds. Shortly after it activates the solenoid for 18 milliseconds. It was at this point the printer broke. It's still operational as a printer, but the little rubber wheel that feeds the paper disintegrated. Upon opening the thing up to gain access to see what was wrong, I had to deal with a sticky mess that was once a piece of rubber. Given these calculators cost something like €30 from Amazon, I'm not sure it's worth the time trying to locate a spare part. Even if I found one (which I don't hold out much hope for), if it's six or seven euros postage, well, that's about a fifth of the price of a shiny new model. But it does mean that I can mess around a little more, as it doesn't matter so much if I accidently break the thing. By messing around, something like this... 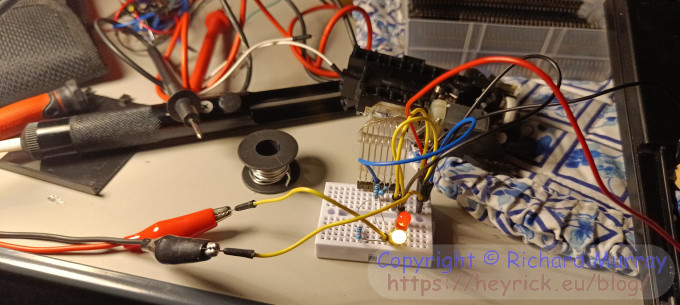 Playing with the printer module. What I'm doing here is running the motor (powered by piggybacking on the batteries that run the calculator) to observe what the rotational sensor is actually doing.
If we look at the sensor in more detail, we can see four contacts. The top and bottom contacts touch the outer ring, which contains thirty spokes that corresponds to two rotations of the print wheel.
 The rotation sensor. If we look at the signal from the upper contact, it looks like this, a seemingly steady(ish) stream of pulses a smidgen under 1ms each, that come in pairs. The two elements of the pair are separated by 3¾ms, then each pair is separated by 4½ms, as can be seen here.
 The result of one contact. Now if we merge in the second contact, the two waveforms together look like this. It's necessary to do it like this as my little oscilloscope isn't dual channel. 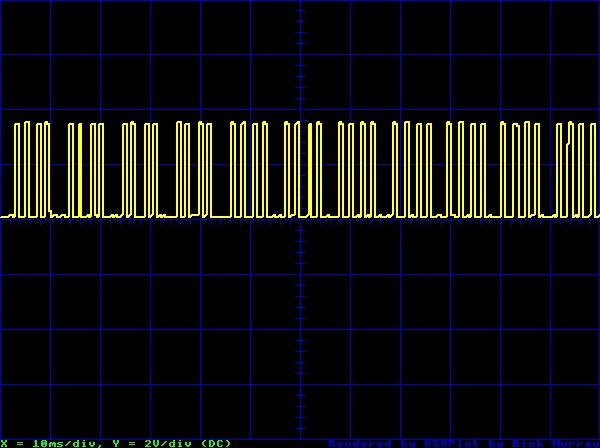 The result of both contacts. If we think of this as, perhaps, number start and end markers, then there are about 8ms between the beginnings of each pair of pulses. So it would suggest that one can time the character printing by activating the solenoid when the start signal is received and releasing it when the end signal is received? Changing the print wheel used? This is actually automatic. The bottom wheel is only used in the rightmost column. It looks as if the second-from-the-right column cannot be used, activating the print mechanism here will cause the print wheel to change position, dropping so the upper wheel is the one that contacts with the paper from this point on. If you turn the mechanism by hand, then things behave slightly differently, which might be due to the difference in speed. In normal use the disc makes a full revolution a couple of times per second, so the wheel is going twice as fast. So take this with a pinch of salt, doing it by hand is a few magnitudes slower. To print a digit:
It remains to be seen if this method holds up when the device is running at normal speed. To print a digit, linefeed, and return to the rightmost column:
With this in mind, I think I was getting hung up on what sort of control firmware would be providing the precise timing for the printer mechanism, which could get 'tricky' if the batteries start to run low and the motor slows down a fraction. Obviously this unit with it's fixed behaviour of "these characters only on the right" and only in one colour is a lot simpler than the other one. There will be numerous similarities in operation. I suspect the only real difference would be what to do to select 'red' as a print option. Otherwise, I can imagine it is largely similar behaviour. Now, you might be wondering why there's an end marker if we pretty much ignore it. Well, we might need to tighten up the timing in normal use, perhaps on at start and off at end? We also use end to get fed back the status of the carriage return. Which means the only unanswered questions here are:
With this in mind, it could now, I think, be feasible to write some code to control this printer from some sort of Arduino or other microcontroller. Briefly, something like this: Get a number to print. Invert it (as we print from the right). Translate it in to wheel positions (relative to HOME). Start motor (a GPIO via transistor). Loop: Wait for HOME Count X-2 START pulses (note: first happens at same time as HOME) Activate solenoid (a GPIO via transistor). Wait for next START. If not final digit, deactivate solenoid. If not final digit, repeat loop. Wait for next START. Deactivate solenoid. Wait for END. Pause while END. When END goes low, stop motor. We're done. A future enhancement would be to keep on tracking the wheel position during printing to determine if it's possible to take a shortcut and print sooner rather than waiting for HOME to sync each time.
Better oscilloscope plots - DSOplot updateI have thickened up the oscilloscope plots so they should hopefully not get so screwed up in mobile mode. This was done be simply having a shadow line that is drawn with an offset of 1 in both X and Y to make the trace line be two pixels thick. This is acceptable as we only really have 300 points across the screen so thickening up the line isn't losing any accuracy.This requires so simple changes to PROCplotpoint in my DSOplot software (described here). Change the end of PROCplotpoint from this: DRAW xpos% << 2, prevypos << 1
DRAW xpos% << 2, ypos << 1
ENDIF
prevypos = ypos
ENDPROC
to this: REM Draw the primary line
MOVE prevxpos% << 2, prevypos << 1
DRAW xpos% << 2, prevypos << 1
DRAW xpos% << 2, ypos << 1
REM Draw the shadow line
MOVE (prevxpos% << 2) + 2, (prevypos << 1) + 2
DRAW (xpos% << 2) + 2, (prevypos << 1) + 2
DRAW (xpos% << 2) + 2, (ypos << 1) + 2
ENDIF
prevypos = ypos
prevxpos% = xpos%
ENDPROC
Now the output lines will be thicker, as demonstrated here.
Your comments:Please note that while I check this page every so often, I am not able to control what users write; therefore I disclaim all liability for unpleasant and/or infringing and/or defamatory material. Undesired content will be removed as soon as it is noticed. By leaving a comment, you agree not to post material that is illegal or in bad taste, and you should be aware that the time and your IP address are both recorded, should it be necessary to find out who you are. Oh, and don't bother trying to inline HTML. I'm not that stupid! ☺ ADDING COMMENTS DOES NOT WORK IF READING TRANSLATED VERSIONS.
  
(Felicity? Marte? Find out!)
📺 The SIBA stories 📹
It's a simple substring match.
Last read at 05:51 on 2024/05/02.


| ||||||
| Next entry - 2023/11/12 Return to top of page |
| © 2023 Rick Murray |
| Retrieved from http://heyrick.eu/blog/index.php?diary=20231111 on 2nd May 2024 |