|
| ||||||
mailto: blog -at- heyrick -dot- eu
You are not reading my b.log using HTTPS. You can switch to HTTPS by clicking here. Mechanical washing machine controller teardown - part one (motor control)A long title, but justified as we're going to end the year with some gloriously mechanical geekery.I liked my rescued washing machine. It was extremely inefficient (sucking in 25 litres for every fill), using a fixed timer for heating, only two speeds for the motor (~50rpm wash and 500rpm spin) and not doing anything like weighing the washing (unlike my new machine), but what it lacked in "intelligence" was more than made up by its incredible simplicity. This is the entire schematic of a slightly better version (the TL560 has an "Eco" button and a second thermostat to cut out the heater at a lower temperature). With the exception of the Eco button and it's associated thermostat, my machine is identical.
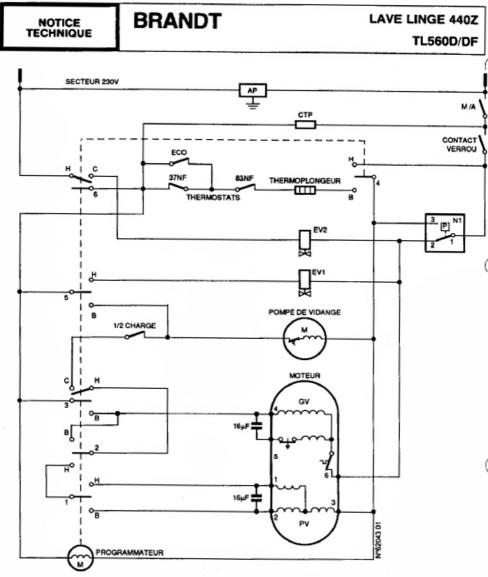 Simple, isn't it?
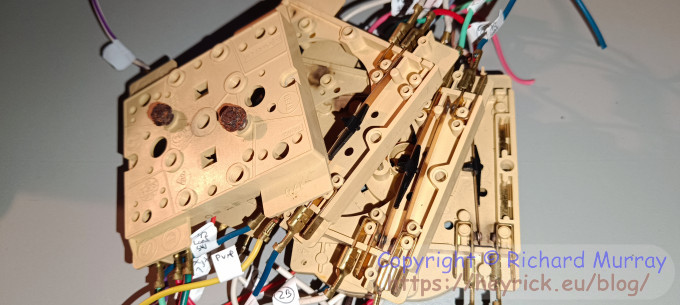
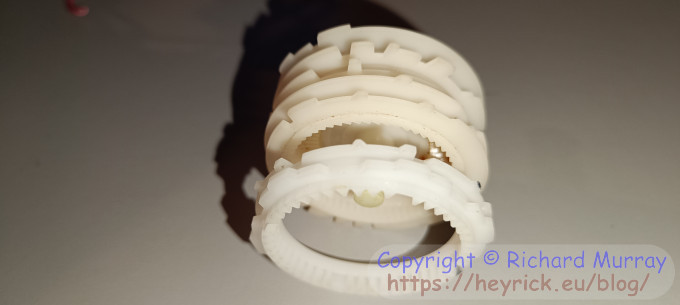
Despite all of this, the machine offered fairly complex behaviour. For example, during the wash cycle, it would rotate the drum slowly for about eight seconds, pause for about eight seconds, rotate slowly in reverse for about eight seconds, and pause for another eight seconds. This would repeat during the washing, where each "segment" of the manual controller lasted for three minutes. Okay, it was clearly designed to do all of that, but it was really clever in how it had so much variation of behaviour for a device that had exactly no integrated circuits. It was entirely mechanical. This thing, in point of fact.
 The controller. Yes, many wires. The entire left side of the schematic represents this controller. Better yet, it's all mains voltage and in some cases dealing with some fairly hefty current. The motor is 250W in normal use and 690W in fast spin, the heater is like your standard 2kW kettle. And here is the outline of the controller behaviour.
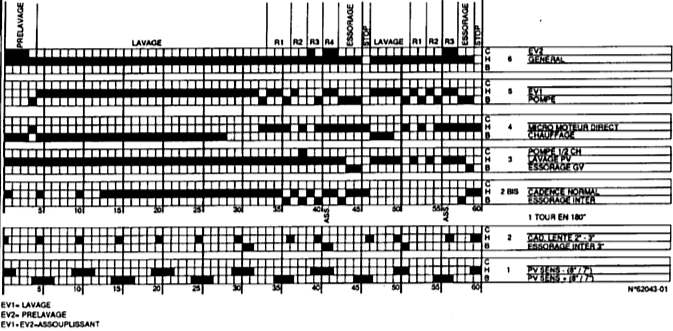 What the controller actually does. Armed with this, we can start to look at how the controller does what it does. Actually, I did most of this without referring to the programme chart above, because it was more fun to work it out for myself. ☺
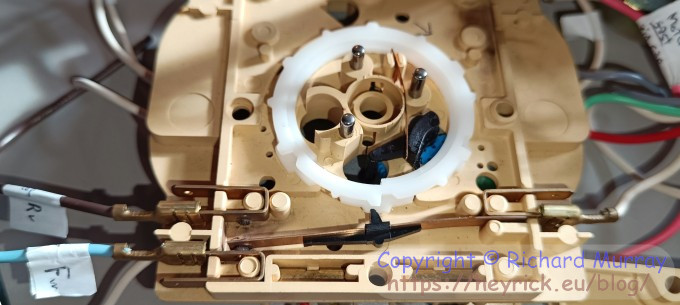
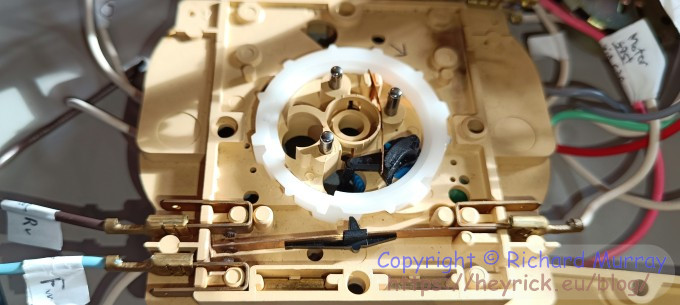
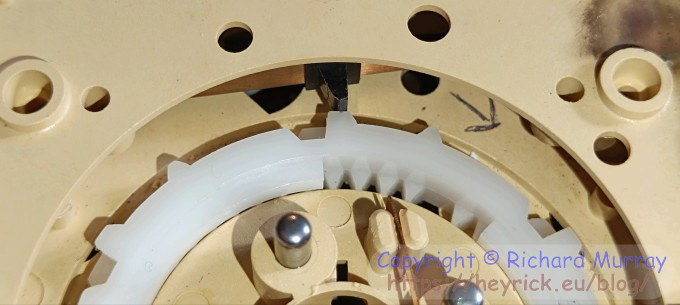
When the unit is opened up, it reveals four levels of switches that are activated by a rotating actuator.
 Inside the controller. Some of these switches have multiple behaviours. In the example below, if the switch is not pressed, then no connection is made. If it's pressed then thare is a connection between the left (mains in, live) and the lower right (heater) as well as much of the rest of the circuit. If it is pressed harder, then it also connects to the contact on the upper right, which is the second water valve (used for the conditioner prior to rinse).
 Switch possibilities.
It's not quite as simple as that, because while this implies the heater is always powered here when the machine is on (correct), there's a different part of the controller that switches the neutral to the heater, plus it also depends upon the pressure sensor (is there enough water in the machine?) as well as the thermostat (is it too hot?).
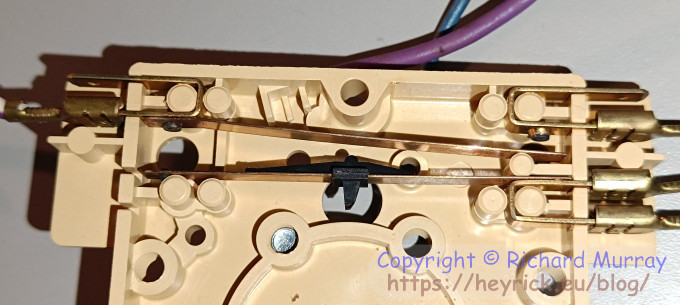
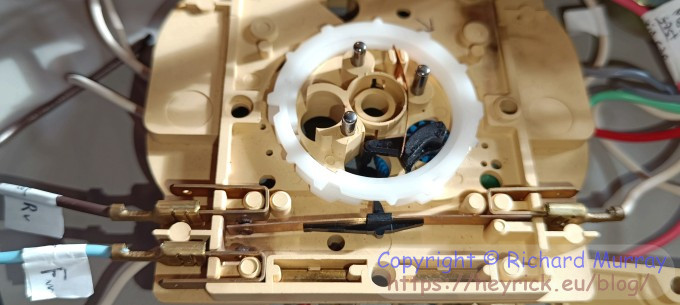
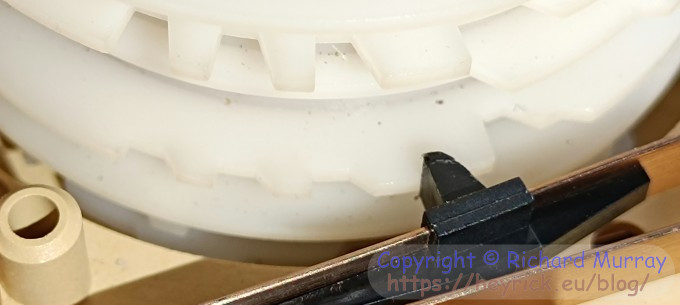
However, the true magic can been seen with the actuator. It's actually in two parts.
 Magic happens. If you look at the programme guide above, you might see on the right just prior to the lower block it says 1 TOUR EN 180'. This is the secret. The thinner wheel, at the bottom here, rotates once every three minutes (or 180 seconds), while the upper wheel rotates in the opposite direction one step every three minutes. Now if we concentrate on the smaller, fast, wheel, it is clear to see that there are two rows of bumps. When laid out, it looks like this.
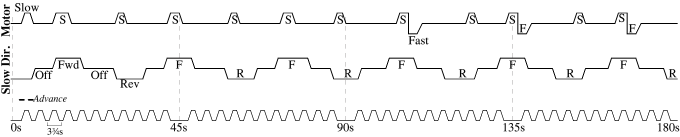 The pattern on the fast wheel. It's a little hard to see, so here it is larger, split into two halves. The dashed green line is the overlap between the two diagrams.
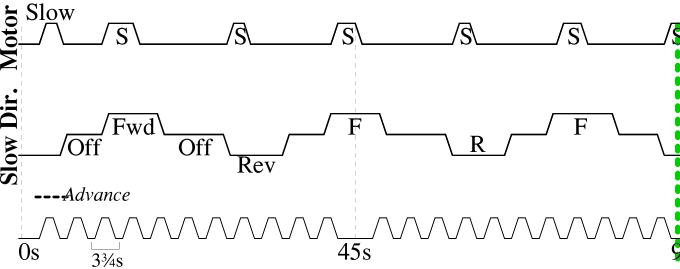 Diagram, left side.
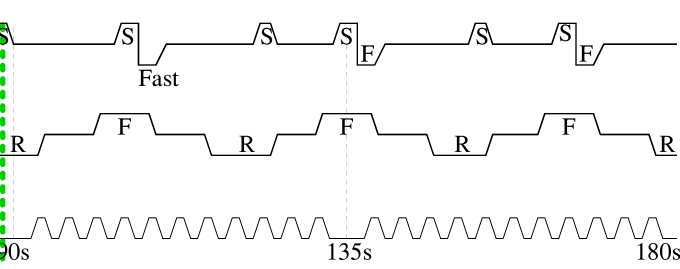 Diagram, right half. To explain the diagram, the teeth along the bottom are the gearing that drives the wheel. It is keyed (the gap) to ensure that it is correctly synchronised with the mechanism that steps the larger wheel.
The lower set of protrusions controls the behaviour of the motor when it is running in slow speed. If the contact is not pressed, then the motor will run in reverse. If it is pressed, then it will not turn at all. And if it is pressed more, it the motor will run forwards. By alternating the pattern between pressed and not pressed, the motor will turn in both directions with a pause in between, with everything running at a little under eight seconds a time. Each 'tooth' is passed in 3¾ seconds, so having the motor turning for two teeth means it'll be running for about 7½ seconds. This, the lower set of protrusions, determines what happens during normal wash. When it comes to the drain part, we will switch to the upper set of protrusions which use the lower set as a directional control. Which means we're running through both sets of protrusions.
As you can see, the machine will do its forward and backward behaviour, but only for about half the time compared to before. And no, it's not badly drawn, the reverse tabs are slightly shorter than the forward ones. This, incidently, corresponds to this part of the programme, with the upper and lower parts here matching up with my diagram above.
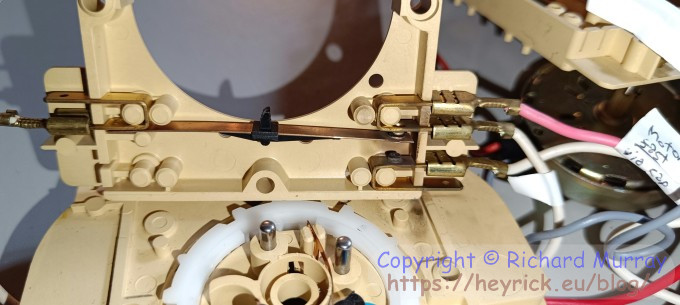
 The programme - fast wheel. But, how does it actually do this? Well, now we need to look at the switches. The first switch is the motor direction one on the lowest level of the controller. Here it is in all three positions. Note which contact is being made, if any, on the lower left of the photo.
 Motor, forward.
 Motor, inactive.
 Motor, reverse.
Now for the speed control, we need to look at a different switch. This one controls whether the motor is powered in fast, or if it goes through the above switch for directional slow behaviour. There is no direction control for fast, the motor only turns one way.
 Fast or slow? If the switch is not pressed, then the motor will run fast and if it is pressed then the motor will run directionally slow. Above I explained the drain switching between slow forward and the fast pulse. Here you can see how that actually looks. Remember, it's rotating clockwise in this picture so it'll be back to front compared to the above diagram.
 Spin pulse in hardware.
"But wait", I hear you say, "What about that six minute fast spin at the end?" Well spotted. For this we require another switch and to introduce the big wheel, for we have to choose whether we want the motor to run according to cadence, don't do anything, or just to belt it at full speed. Which is the lowest level of the big wheel.
 Cadence, or not.
If the switch is lightly pressed, no connection will be made and the motor won't turn. This happens for the first half of the drains in the gentle (delicates) programme, and - obviously - when the machine is moving to the STOP position. Here is an annotated diagram of how this works. The first part is if we're going via cadence.
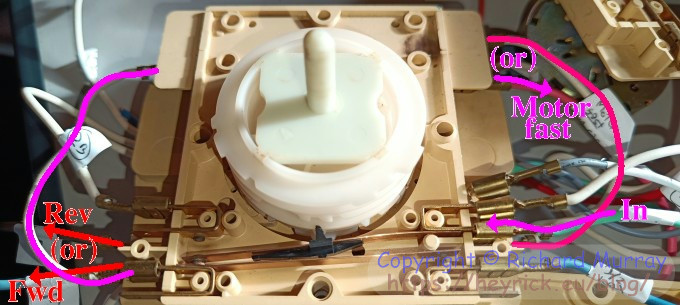 Cadence, annotated. Okay, this one is a bit hairy. Bear with me. The 'input' is on the lower right of the picture. The contact on the lower right has been made, so we follow the magenta highlight to the next switch, which is under this upper level of the controller (the fast/slow one described just above). Output from this switch (upper right of the picture) is either to the motor's fast winding, or the reddish highlight that winds around to the lower level (lower right of the picture) where it passes through the direction selection switch, to finally exit at the lower left of the picture where it passes to either the slow forward or slow reverse winding of the motor. However, if the motor is desired to be run in fast for longer than pulsed, this switch is released and the contact moves to the other side, as shown in this picture.
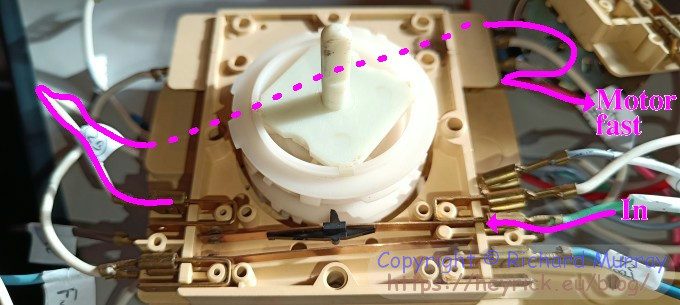 Fast, annotated.
In this case, power enters at the lower right as before, to pass to the other output on the left. This is a single wire that passes underneath the controller (the dotted line) and is hooked into the same terminal as the output to the fast winding of the motor. This switch corresponds to the following part of the programme diagram:
 Cadence/fast programme.
If you looked closely to the annotated pictures, you might have noticed that there is actually another switch. Lower right of the picture (hidden behind the copyright gumph ☺) and mentioned in the above diagram. It's the half load control.
What the half load control does is really simple. If you have a half load, rather than using less water when filling the machine (because that would require a more complicated pressure sensor), it simply skips tossing out the water during the second rinse, saving 25 litres (and thus consuming only 100 litres for a wash instead of 125!). Essentially rinses two and three are combined as one longer rinse. For normal water extraction (the other rinses and during spinning), that's a different switch and that's a topic for another blog article.
Today we looked at the various ways of controlling what the motor is doing and how that is actually done in hardware. I hope you enjoyed this look at a little mechanical marvel. A simple mass produced device sitting in the hearts of pretty much every washing machine from the era when selecting a wash cycle meant cranking a big knob around until an arrow pointed at the desired programme. And, sorry if you expected something with chips in it, but I find this sort of thing fascinating. A reliable and surprisingly capable controller that is entirely mechanical.
Your comments:Please note that while I check this page every so often, I am not able to control what users write; therefore I disclaim all liability for unpleasant and/or infringing and/or defamatory material. Undesired content will be removed as soon as it is noticed. By leaving a comment, you agree not to post material that is illegal or in bad taste, and you should be aware that the time and your IP address are both recorded, should it be necessary to find out who you are. Oh, and don't bother trying to inline HTML. I'm not that stupid! ☺ ADDING COMMENTS DOES NOT WORK IF READING TRANSLATED VERSIONS.
  
(Felicity? Marte? Find out!)
📺 The SIBA stories 📹
It's a simple substring match.
Last read at 15:51 on 2024/05/02.


| |||||
| Next entry - 2023/12/31 Return to top of page |
| © 2023 Rick Murray |
| Retrieved from http://heyrick.eu/blog/index.php?diary=20231230 on 2nd May 2024 |