Rick's b.log - 2014/01/04
You are 3.144.45.187, pleased to meet you!
Rick's b.log - 2014/01/04 |
|
| It is the 24th of November 2024 You are 3.144.45.187, pleased to meet you! |
|
mailto: blog -at- heyrick -dot- eu
Unkindly, the address label shouted out my phone number. Sodding bloody eBay/PayPal. Usefully however, it was my old phone number.
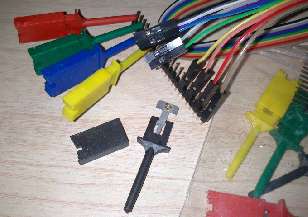
Anyway, the RaspberryPi can apparently be coaxed into bashing JTAG out of some of its GPIO and since the Pi runs at 3.3V and the Neuros OSD I want to try to resuscitate also runs at 3.3V, you can join the dots... [the Beagle, contrarily, runs at 1.8V]
Fast forward to modern times. This distinction no longer makes much sense. As it happens, since USB sticks and SD cards are, technically, removeable media, they count from :0.
This brings us to FSLock. This module was originally written for use in an educational environment, to intercept attempts to write to the harddisc or play with the configuration. In effect, when it is running, drives :4 to :7 are read-only. In response to this, RISC OS will automatically - at boot - create a RAMdisc and set up a minimal place for scrap files and user choices (which will not persist) to be stored. Quite a clever way to try to kiddie-proof the system, which wouldn't work against the clued-up children but ought to be enough for the majority.
Until now, that is.
This modification is unofficial, not (yet?) a part of the official OS release. So in order to use it, you will need to be able to build the RaspberryPi ROM for yourself. If you have purchased the NutPi, you can! It is not that difficult actually, it just takes a really long time to do it! Follow my instructions here and you'll be all set.
Now to turn our attention to FSLock. Because this program was purchased by Acorn from a company in New Zealand, it is one of the few in the source collection that is assembled from BASIC code. If you installed your code at the same place I put it in the tutorial linked above, you will find FSLock at
If you know assembler, you will see that the program only pays attention to drives over :4, so all we are going to do is tweak the code to look from :0 to :3. FSLock is only designed to handle four drives, so to keep the modifications simple, we'll leave that alone. There is only usually one SD slot on most devices with RISC OS, and at most two. Alternatively, if you prefer to protect USB devices, chances are you won't be running more than four at a time...
Here are the modifications, the parts in bold are the changes:
This follows ".Scan_end_of_FSName":
Afterwards, although it looks a lot, you're only really changing four characters:
Finally, tweak the out-of-bounds catch:
That's it. Save the updated program.
Now, to build it, click Menu within the FSLock directory and choose the "
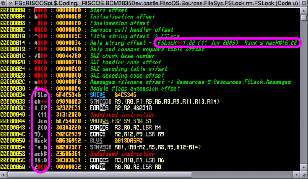
Open the rm subdirectory and drag the FSLock module within to your editor. Don't worry if it looks like gibberish - just look for the version string and ensure it has the suffix you added above.
Here is how that would appear in !Zap - the pink boxes indicating where you should look:
And for completeness, here is how it would appear in !Edit:
Now rebuild the ROM - not completely, this time you only need to Make ROM, Install ROM, and Join ROM. This is a lot quicker than a full build.
How to use. If you are protecting SDFS, there is a quirk in that you cannot directly configure the protection to be off as the settings are held in the ROM image which is in $.!Boot.Loader of SDFS drive :0. That's right, your configuration would be discarded.
Therefore, follow this process to turn protection OFF:
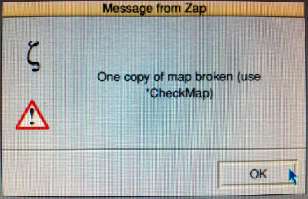
This is not a good thing to see.
This is a very very bad thing to see.
Now, the most important advice I can give you is:
No - seriously. There is a reasonable chance that if you restart your machine, RISC OS will refuse to mount the media. Without specialist tools (for instance, DiscKnight), your data will be lost.
If you have a copy of DiscKnight, use it. Only continue with what it says below if the problem cannot be repaired by DiscKnight and you have not rebooted.
Assuming you didn't have DiscKnight... [you probably ought to get it, it's only £10! also quoted as €13,99 which is a nasty markup (about 15%), your bank may offer you a better deal if you just pay it in sterling...]
First, check you can still see your files. Open a filer window. It should work. If you cannot, or all you get is "Broken Directory", give up at this point.
If, on the other hand, you can still access files, continue!
Using another machine, you will need:
What you need to do first is download the RISC OS image and write it to the SD card. How to do this is described here in a video.
If you are running FAT32FS, enter the command
Insert the SD card you just made into the USB SD card reader (if you didn't already do this) and then plug it into a USB port on the Pi. This would probably work better if you had a USB hub installed. If not, gently remove the keyboard (you'll definitely need the mouse, the keyboard you could work around).
Clicking on the USB device icon that appears should open the FileCore partition (you'll see !Boot and a bunch of other things). If it opens the FAT partition, dismount this and try right-clicking the icon.
Paying careful attention to the devices, you will want to copy all of your files from the older SD card (window title most likely starting SDFS::) on top of the content present on the disc you just made (window title most likely starting SCSI::) - but do not copy !Boot.
This will be time consuming and boring if you have a lot of files. But be patient. Copy everything you can - but if you see any directories that look wrong, do not go near them. In my faulty disc, I had the directories Co, Cod, Codi, Codin, and Coding. The latter was correct. The other four were not. I didn't even attempt to open them.
Now we will turn our attention to !Boot. This is the glue that holds a lot of things together. You can recover from losing this by reinstalling everything, but it is a right pain in the ass to have to do this.
Open $.!Boot on both devices. Copy everything that is not "Loader" from old to new. There's a fair bit of stuff in there, so give it time.
Now open $.!Boot.Loader on both devices. On the new SD card, delete whatever is in there, and copy across everything from the old SD card. Nominally, this will be the files BOOTCODE/BIN, CONFIG/TXT, FIXUP/DAT, RISCOS/IMG, and START/ELF.
That's it.
But we are not done yet. This is probably your last chance. Check that everything has been copied. A sneaky way to do this if you don't want to actually check every file is to do a Count on the directory on the old and the new and make sure the file counts and byte sizes match. Certainly for things like $.!Boot (3,274 files, ~136MiB) or the RISC OS sources/development (13,221 files, ~345MiB) it isn't really feasible to check off the files one by one.
When you are happy (or at least not about to suffer potty failure), it is time for a minor freak out.
Shut down your Pi, unplug it.
Switch SD cards - put the new one with all the files copied to it into the Pi's SD slot, and put the old damaged one into the SD reader.
Hold your breath, and power up the Pi.
With a little bit of luck, it should boot with most/all of your files present. And chances are you won't be able to access the files on the older card.
There.
This might be a good time, incidentally, to shut down the Pi, transfer your new SD card back to your PC and read and image of it (for goodness sake, don't write an image on to it!). This will make it easier to recover should this happen in the future.
Having learned from this, I now plan to take periodic images of the SD card so instead of going through all of this I can just image another SD card off of the most recent copy and transfer across the files that I have changed since then. Or, if I don't feel any changes there are worth worrying about, just reimage on top of the damaged one.
The maths is interesting.
The generic movie tends to run for 1h30, the epic you-should-watch-this can easily top two hours. Haruhi Suzumiya's movie rolls in at nearly three hours. So, to end questions of disparity, I will calculate the good running time by averaging the top ten rated movies on IMDb.
The Shawshank Redemption 142m; The Godfather 175m, and part 2 200m; Pulp Fiction 154m; The good, the Bad, and the Ugly 161m; The Dark Knight 152m, 12 Angry Men (only!) 96m; Schindler's List 195m; LOTR: The Return of The King 201m; Fight Club 131m.
Okay - mashing that all together, we get an average film playing time of 160.7 minutes. Or 2h41m. Ten minutes longer than Apocalypse Now but yet twenty minutes short of The Green Mile. Just as long as Suzumiya Haruhi no shōshitsu - epic! ☺
That seems long, so I will pick entries 42, 68, and 123 to check against. Over to IMDb and #42 is Dr. StrangeLove (95m), #68 is Taxi Driver (113m), and #123 is Heat (170m). So let's tweak our expectations down a little for a nice round 2h, shall we? That sounds a good figure.
Okay, this also helps keep the maths fairly simple. 120120 minutes (avg.) to watch 1001 films. Which as you might have already guessed, is 2002 hours. Or 167 days if you watch 12 hours of films a day. Being more realistic, four hours a day and only on weekdays. That's two films a day, ten a week; pretty much 700 days. Which is near enough two years (probably a mite more if you throw in public holidays).
Don't like the barrage of geekiness? Try this instead!
Some New Year geekery - JTAG one step closer
First up, the stuff I ordered off eBay back in mid December arrived today. It cost five euros and was ordered on the 11th. I received an email saying that postage would be, and I quote:
I will send out your order by China post air mail today and 40-60 days from China to you .
It arrived today, from Germany. Twenty four days including two major holidays.
Not bad.

More geekery - patching FSLock for Modern Times
In the world of RISC OS, with the specific exception of the FileStore, it has been a sort of rule that each filing system could offer eight drives. These drives were originally physical devices, with drive numbers 0-3 being reserved for floppies, and drive numbers 4-7 for harddiscs. This is why on older Archimedes era machines had the quirk that if you installed a new filing system (such as an IDE card), your drive would be called :4.
This rule was frequently semi-broken. For example, the Simtec IDEFS cards worked around RISC OS's inability to handle devices larger than 512MiB by using partitioning. Therefore one 2GiB device would appear as drives :4, :5, :6, and :7 (all 512MiB each). Obviously, a dual IDE card can support four devices, and if those devices require partitioning... Somewhere I have a screenshot of my iconbar on a system which had two internal IDE harddiscs (ADFS), eight IDEFS partitions, two SCSI drives, a SCSI CD-ROM, and a floppy. Suffice to say, there wasn't a lot of space left!
Unfortunately, you cannot apply the same degree of protections on modern machines. So if you set up a nice installation on a Pi for your own children, you can't lock it down (doubly so as the Pi's write-protect tab is not wired to anything!).
$.Coding.RISCOS.BCM2835Dev.castle.RiscOS.Sources.FileSys.FSLock.FSLockSRC. Load it into Zap (preferred) or StrongEd, Edit, etc.
550 helpstring$ = FNformathelp("FSLock",version%,"")+", Rick's hack#"+MID$(TIME$,17,5)
Append a note to the help/version string to indicate that the modified version is in use. This will show up in *Help FSLock and *Modules.
14320 ;
14330; Hacked by Rick to lock drives 0-3 for SDFS/USB drives, etc
14340;
You can leave this out if you want, but it'll throw off the following line numbers. If you are using Zap, press Shift-F8 now to renumber because it probably inserted those lines as 14311-14313.
14450 MOV R1, #ASC("0") ; Drive number next... [was '4']
then:
14570 MOV R9, #ASC("0") ; R9 = ASCII drive number 4.... [was '4']
14680 CMP R9, #ASC("0") ; [was '4']
14690 MOVEQ R7, #Hard1%
14700 CMP R9, #ASC("1") ; [was '5']
14710 MOVEQ R7, #Hard2%
14720 CMP R9, #ASC("2") ; [was '6']
14730 MOVEQ R7, #Hard3%
14740 CMP R9, #ASC("3") ; [was '7']
14750 MOVEQ R7, #Hard4%
14890 CMP R9, #ASC("4") ; Drive number next... [was '8']
Set directory ^W" option. Then double-click on the FSLockSRC program.
For the current version, this would be: FSLock 1.22 (11 Jun 2009), Rick's hack#xx:xx (where xx:xx is the time hh:mm of when you built the module).


The file close is because the boot loader DOS partition is opened read-only when locking is active, so you need to force it to be reopened read/write, otherwise things that write to CMOS RAM will return “File is not open for update” errors, and you’ll never be able to turn off FSLock.
Recovering data if your filesytem map is damaged
I was programming the other day, not doing anything taxing to the machine, when this appeared in front of my eyeballs just out of the blue:

In fact...
DO NOT REBOOT. Okay?
*RMKill FAT32FS.
If that still does not work, check that you are not using FAT32FS. You want plain old DOSFS for this to work.
Done.
Something to consider
I saw this in a French bookshop:

As you can see, films worth watching have an extended playing time.
It's at #14 we see a film from this decade (Inception, 148m), the next being #44 (The Untouchables, 112m). It seems that the golden era of epic films was the '90s. Of the top 30, 11 are from the '90s.
No comments yet...
| © 2014 Rick Murray |
This web page is licenced for your personal, private, non-commercial use only. No automated processing by advertising systems is permitted. RIPA notice: No consent is given for interception of page transmission. |