It is the 1857th of March 2020 (aka the 31st of March 2025)
You are 3.137.200.242,
pleased to meet you!
mailto:blog-at-heyrick-dot-eu
A pleasant day
I stayed in bed late, partly because it was Sunday and partly because it went down to -1°C in the early hours which meant it took a while to warm up. About noonish (I was up way before that, was doing some stuff indoors), I went out. It had reached two digits, so was warming up. I wasn't too sure about the weather, quite a lot of cloud around.
My arm hurts from all the sawing that was required to fell and chop all those trees. I decided that I was going to have an easy weekend and not do anything stressful like that.
Yeah.
About that...
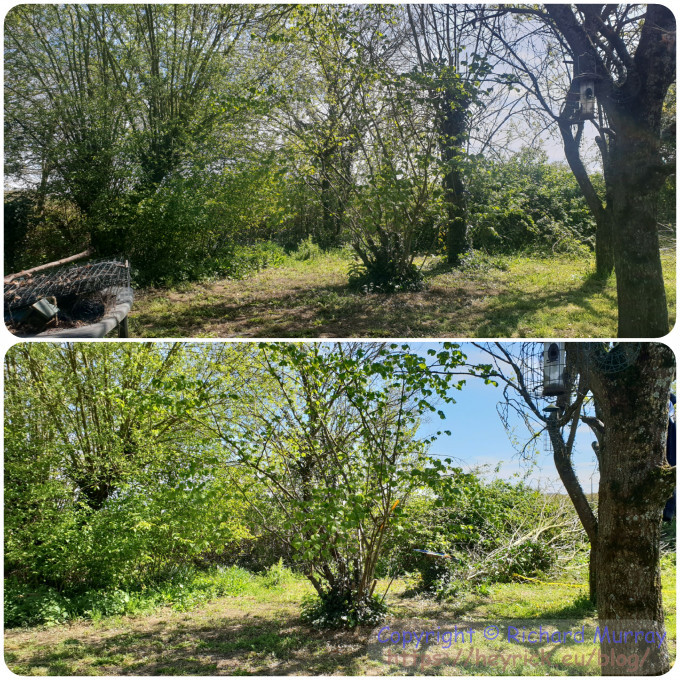
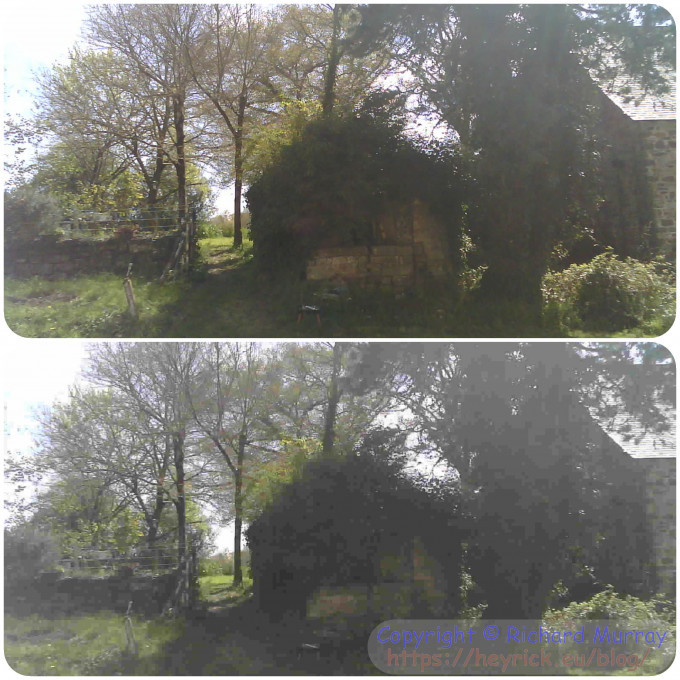
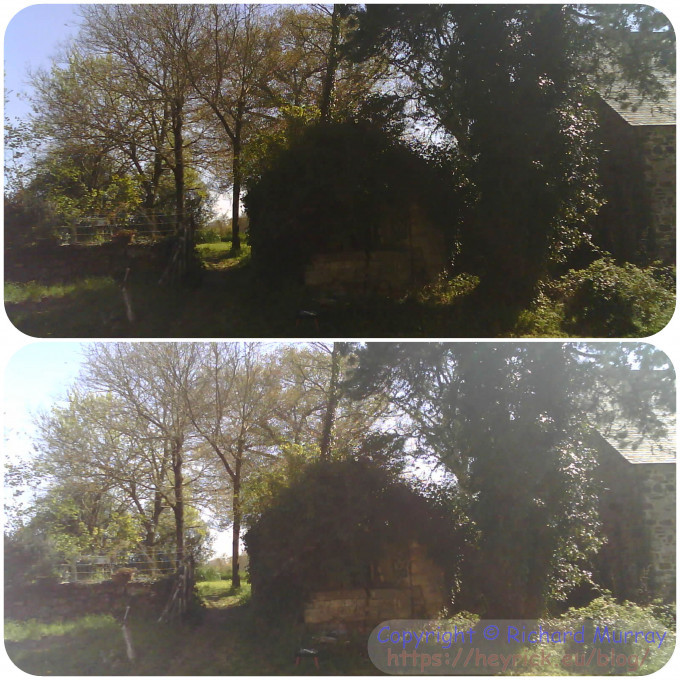
A "before" and an "after":
An unwanted willow is felled, for the second time.
It took forever to saw through that tree, and it was holding on by a piece of wood about the size of your thumb. But, eventually, it was taken down. With no help whatsoever from the cats. Thanks guys!
The gage can grow in peace now, without the fast-growing willow crowding it out.
Bad news? There's a big trunk that I still have to deal with.
Worse news? There are a few more unwanted willows that have sprung up.
Plus, I noticed, a lot of cleavers to deal with.
Through the afternoon I wrote the information below about the many options of the ESP32-CAM. The clouds had all gone away and it was really quite hot. It actually touched 16°C at half three, so I'm glad I opened the windows.
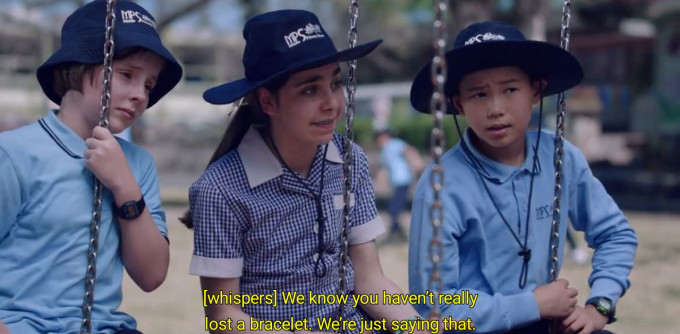
Because it felt hot in the sun, I put a hat on, like an Aussie kid. Case in point...
Screenshot from The InBESTigators, on Netflix.
Okay, okay, these kids (in a Netflix programme called The InBESTigators) are probably dealing with 30°C as it's set in a suburb to the south east of Melbourne, and I'm dealing with half that, but they're Aussies so they're naturally badass (even ten year old girls) and I'm just a whingin' pom. ☺
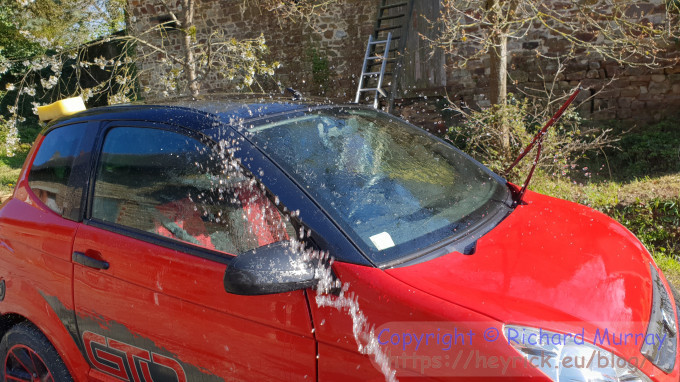
At about half five, I finished writing the ESP32-CAM stuff, so time to give Caoimhe a wash.
Car wash, the way that doesn't eat euro coins.
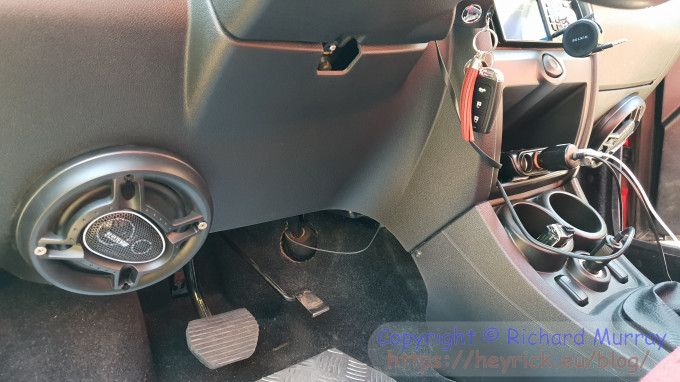
Following that, I swapped out the speakers supplied for the ones Alison gave me, which fit this car perfectly. No need for half-ass wedging the speakers in. I was even able to fit the speaker covers, though I needed to dig up some longer screws as the original ones were too short for all the layers of plastic.
Much improved bass response, too.
Better speakers.
And, finally, I ought to go and make something to eat, but even as the temperature is slowly dropping, I am enjoying sitting in the evening sunshine to write this. But, alas, cats to feed and clothes to get off the line and windows to close and Rick to feed and..... I'd better upload this and get a move on!
ESP32-CAM examples and settings
The standard ESP32-CAM interface offers a pile of options and settings. I'll describe what they mean with some examples.
First of all, one has to note that internally, the camera offers three modes of operation:
Read every pixel
This is used for the XGA, SXGA, and UXGA image sizes (that is to say, everything above 800×600).
Read every other pixel
This is used for the VGA and SVGA image sizes (the 640×480 and 800×600).
Read every fourth pixel
This is used for CIF (400×296) and everything below.
What happens is that the camera reads the image in one of those default sizes (1600×1200, 800×600, or 400×296) and scales it if necessary to one of the other sizes, if chosen.
Unfortunately, the act of reading different pixels like that does have a noticable effect on the image. Not just the quality, that is to be expected given the reduced number of pixels used, but also on the way colours appear.
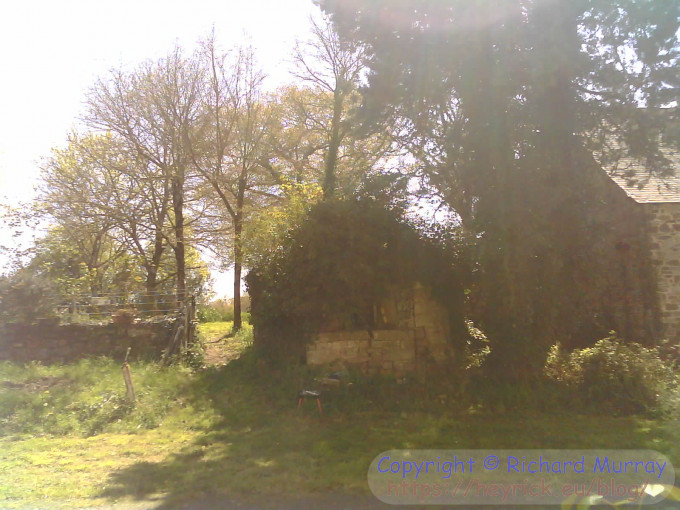
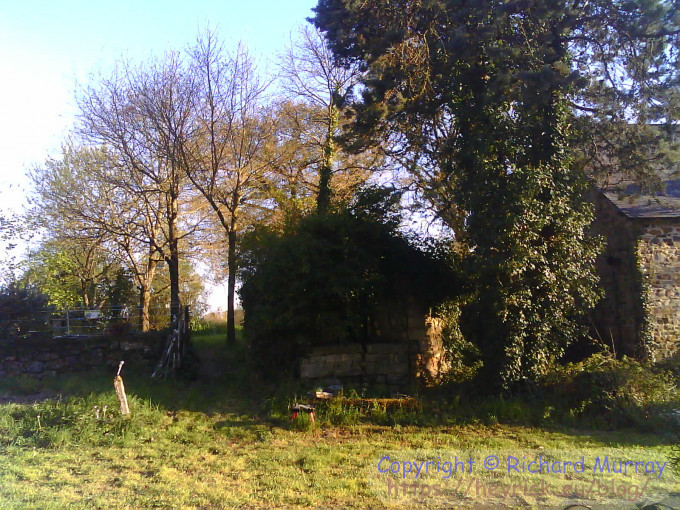
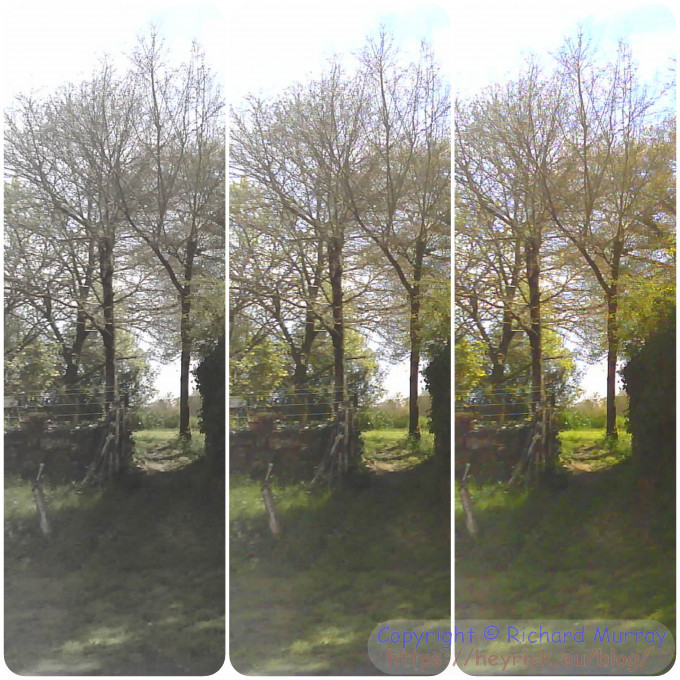
Here is a resized (to fit the blog) image built from every pixel.
UXGA, using every pixel.
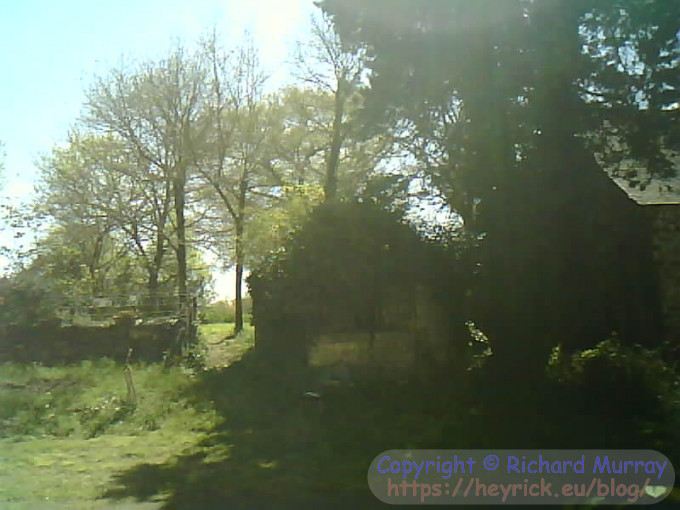
Here is a resized (to fit the blog) image built from every other pixel. This was taken moments before the UXGA image above.
SVGA, using every other pixel.
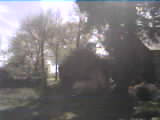
And, finally, here is an image built from every fourth pixel. As before, this was taken just before the previous image.
CIF, using every fourth pixel.
As you can see, the colour rendition of the lower size images is rather poor. Every other pixel gives an image that is less green and vibrant, while every fourth pixel looks like a winter's day.
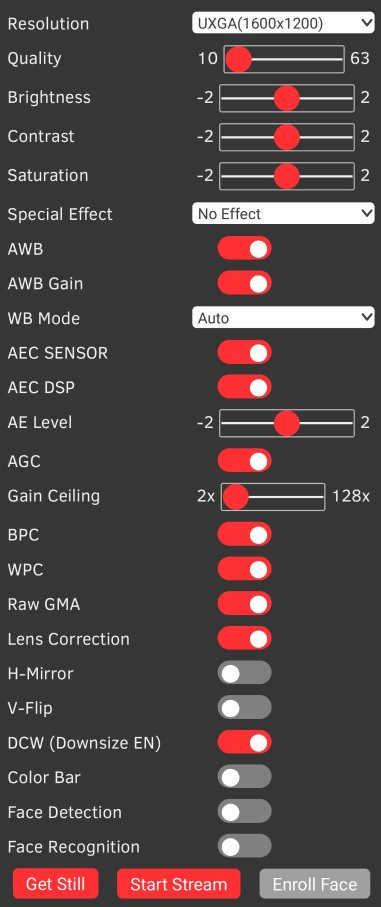
When you go to use the camera with its browser interface, there is a huge variety of controls, namely this:
ESP32-CAM controls.
It appears as if the "Toggle settings" that appears at the very top (not in the screenshot) is slightly broken. It switches the entire control panel between visible and invisible. You'd perhaps have thought that it might have made more sense to leave the "Get Still" and "Start Stream" buttons?
Okay then. Let's go!
Resolution
This allows you to choose what size your images will be. If you have the bandwidth, stick with UXGA as it'll give the best quality images.
Note, however, that face recognition requires CIF or smaller.
The smallest image size is QQVGA or a quarter of a quarter of VGA, 160×120, which looks like this:
QQVGA.
I'm old enough and crusty enough to remember when games consoles were barely better than this, and it was cutting edge stuff.
I would like to point out that all of the examples shown below were taken with temporal proximity. They were all UXGA format, saved on my Samsung S9, and turned into a "collage" using the built in collage maker, to allow direct comparisons.
Quality
The quality setting goes from 10 (best) to 63 (worst).
Don't be tempted to fiddle with the quality to speed things up, as the JPEG encoding is performed by the camera module, not the ESP32, so while downgrading quality can improve speed, it's not as big a boost as you might think.
Below is an example of the same image at both extremes of quality. The upper half is maximum quality (10) which produced a 218KiB file, and the lower half is the minimum quality (63) which produced a 68KiB file.
Quality examples.
One time when it may be necessary to adjust the quality is if there is a lot of contrast inherent in your image. You will spot this because there will be a missing bit at the bottom of your image. This means that it maxed out (at 375KiB).
The image below failed with a quality of 10. Dropping the quality just a touch (to 12) allowed me to have the image without corruption.
Dropping quality to capture the entire image.
That image is the front at ten to eight in the evening.
Brightness
Just like with a TV or monitor, this controls the overall brightness of the image. It pretty much lightens or darkens everything, so isn't a great way to adjust things, but might be useful in some circumstances.
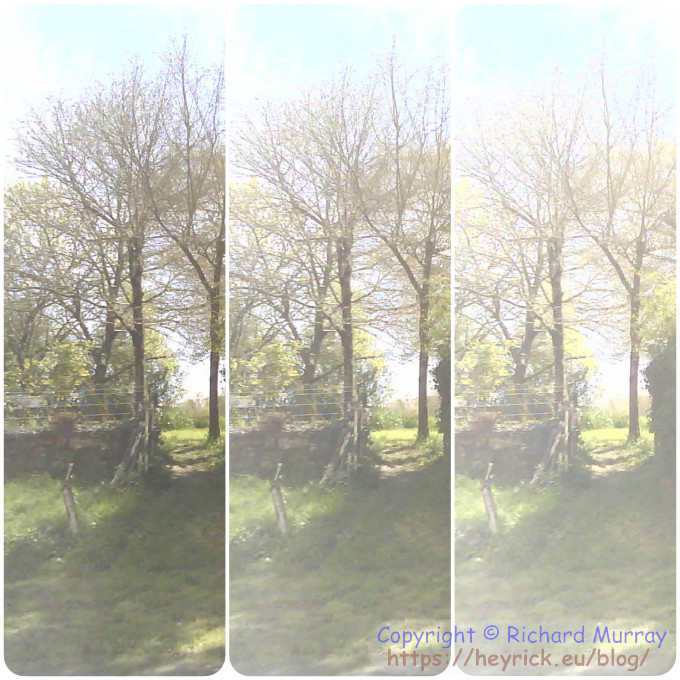
To the left, the brightness set to -2. In the middle, default (0) brightness, and to the right, the maximum (+2) brightness.
Brightness examples.
Contrast
This is a more useful setting. It enhances (or reduces) the difference between the light and dark parts of the image. I tend to find a contrast setting of +1 to be pleasing, it also appears to sharpen the image slightly (it doesn't, but with a touch more contrast, edges stand out better).
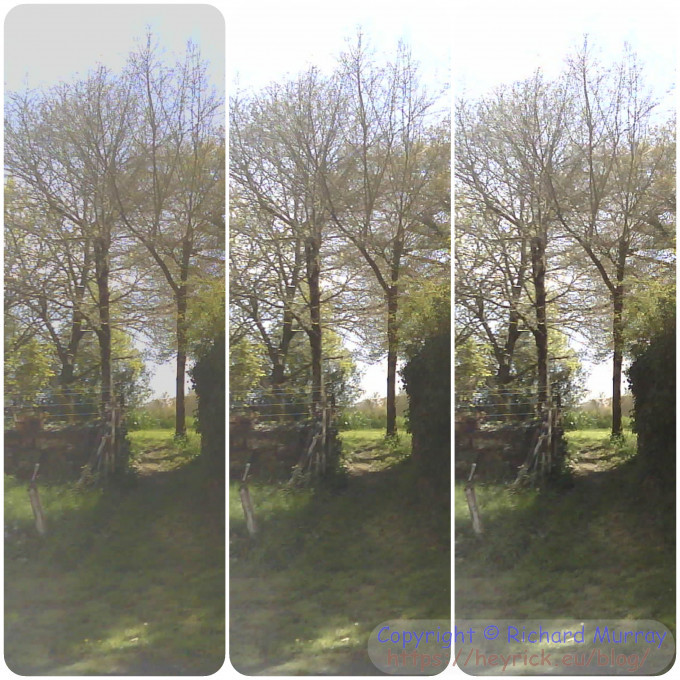
As before, -2 on the left, 0 in the middle, and +2 on the right.
Contrast examples.
Saturation
Saturation is the intensity of colours. No saturation would look monochrome, and total saturation would look like a cartoon.
As with brightness and contrast, the camera offers saturation in the range of -2 (on the left) to +2 (on the right). Depending on the conditions and the scene, a saturation of +1 might help to make the image more vivid.
Saturation examples.
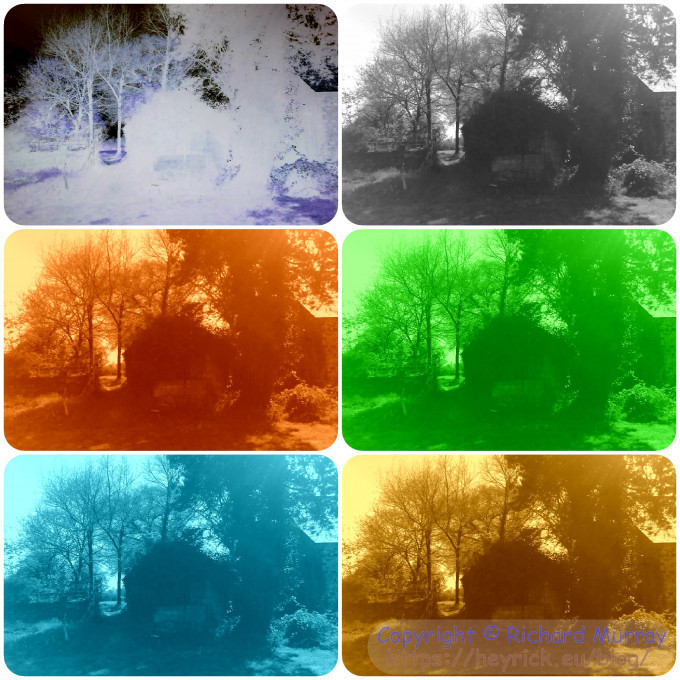
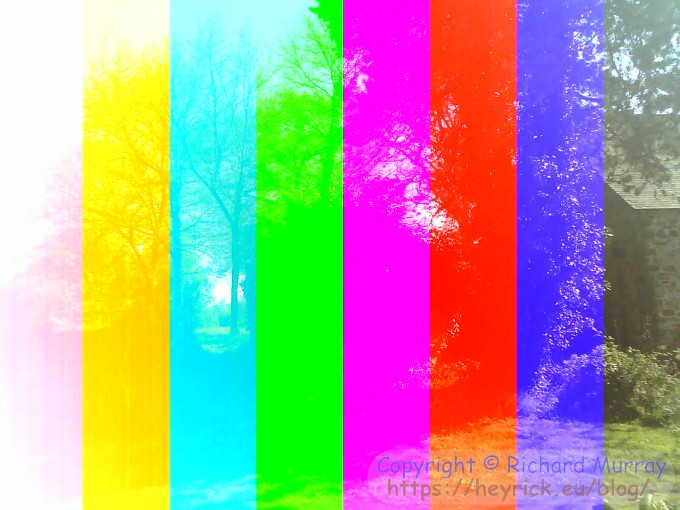
Special effect
Your possible effects are negative, greyscale, red tint, green tint, blue tint, and sepia (retro).
These are pretty much gimmicks. It's always better to capture in full colour, as all these sorts of things can be done with more finesse in post production using any competent image editor.
Effects examples.
AWB, AWB Gain, and WB Mode
AWB means Automatic White Balance. That is to say, to alter the colour rendition in order that white looks like white.
This might seem obvious, but what white looks like on a sunny day, a cloudy day, and under a domestic lightbulb...is entirely different.
The logic goes, if white looks correct, then so should the other colours.
The AWB setting turns the automatic ajustment on and off. AWB Gain, along with WB Mode allows you to switch to a preset if the automatic adjustment isn't quite getting it. However, in my (limited) experience with this camera, the best results are obtained by leaving the camera on fully automatic.
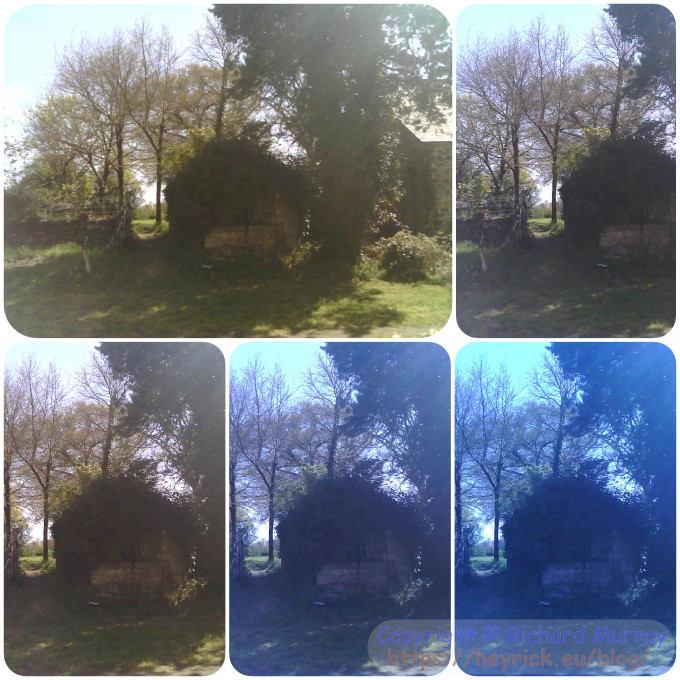
In the examples, the big part is the original image on automatic. To the right of that, "Sunny". Along the bottom row, "Cloudy", "Office", and "Home".
Personally, I believe one of the Office or Home to be incorrect. You see, Office has a strong blue hue. Perhaps this is to counteract the typical fluorescent lighting found in offices. Home, on the other hand, is an even stronger blue. I'd have expected something to counteract typical tungsten-style "warm white" lighting typically found in homes. I've not tried the camera at night, so I don't know which is correct, suffice to say that the cold blues of fluo tubes and the warm reds of tungsten lights are completely different. Something is surely wrong with these settings?
In my tests, mostly outdoors, the best results were obtained just by leaving the camera on automatic.
White balance examples.
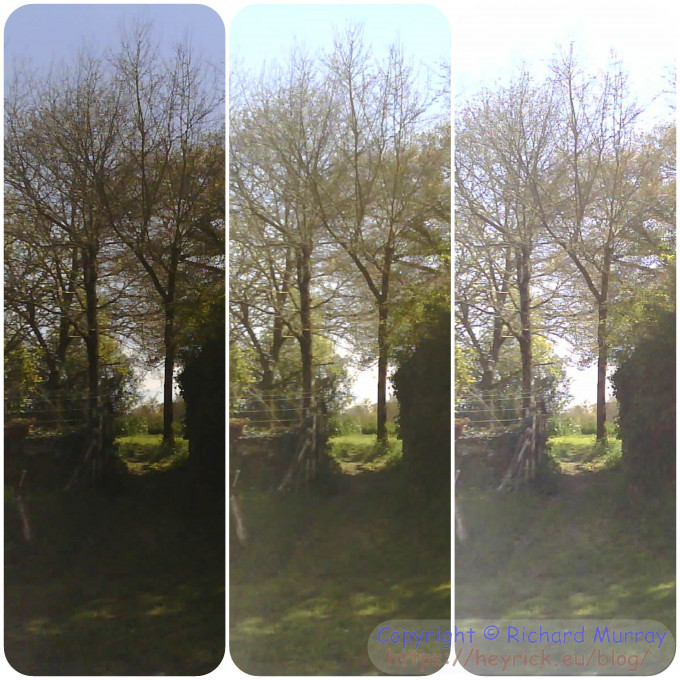
AEC Sensor and AE Level
This controls the Automatic Exposure. If you are shooting in daylight, leave the AEC Sensor on.
It works in tandem with the AE Level, which has a -2 to +2 range. Unlike Brightness, this doesn't just apply a lightening or darkening to the image, it instead controls the exposure. With -2, the exposure is made a little shorter so the image will appear darker. With +2, the exposure is made a little longer so the image will appear brighter. The purpose of this is usually to help to bring out details in the darker parts of images. Or if taking pictures with a bright background.
AEC examples.
AEC DSP
This applies some sort of Digital Signal Processing to the Automatic Exposure Control. I'm not exactly sure what, as the camera datasheet is missing quite a number of details, suffice to say that there is a clear difference between this turned off, and this turned on. It might slow down image acquisition or something, but on the other hand it helps images to look more vibrant.
AEC DSP examples.
Exposure Do not use this in daylight.
This option is only visible if the AEC is turned off. In this case, you have direct control over the exposure. Which is an ISO-like option from 0 to 1200. In daylight, anything above about 50 will result in a mostly white image. The drag-button is far too small for the sort of level of control necessary to set the exposure correctly.
Your best option is to set AEC and use the AE Level to push it a little as necessary.
AGC
This sets the Automatic Gain Control, how the camera responds to the overall level of light in the image. This is best left on.
Gain Ceiling
This is visible when AGC is on, and it goes from 2× to 128×. This might have some effect in the dark, perhaps? In daylight it doesn't seem to do anything.
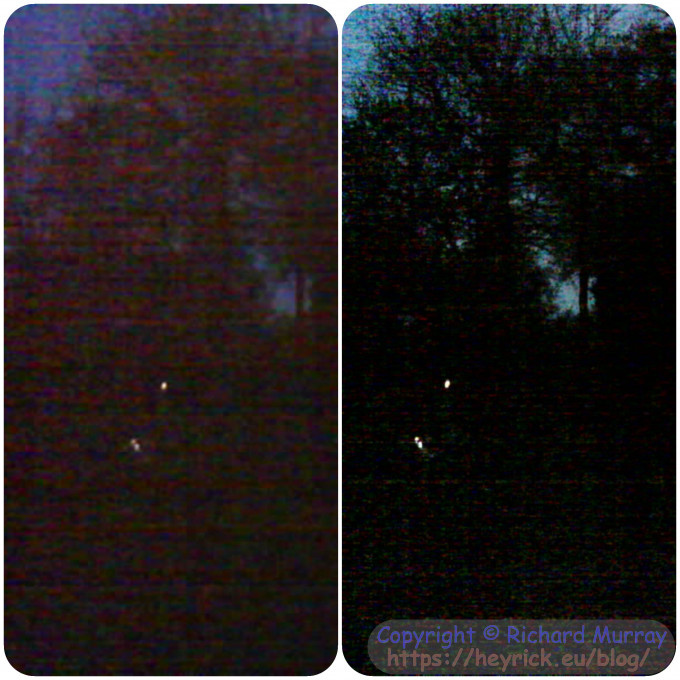
Gain
This is visible when AGC is off, and it goes from 1× to 31×. Gain is an amplification of the values read from the image sensor.
How this differs from Brightness and Exposure:
Brightness - adds or subtracts a value from each pixel of the image to lighten or darken the image.
Exposure - adjusts the sensor's sensitivity to light.
Gain - amplifies the values read from the sensor.
It is subtly different to Brightness and Exposure, and like cranking up the Exposure, doing likewise with Gain will increase the noise visible in the image.
This is probably best demonstrated with a test that I did last night. It was twilight. The dots you can see are little solar lights. The image on the left is what the camera saw with it's Exposure cranked right up. The image on the right is the Exposure and the Gain. Notice how much visible noise is in the lighter patches of sky.
On fully automatic, the image was completely black except for the points of light from the solar lights.
Note that Gain is unlikely to do anything useful in daylight.
Gain examples.
BPC and WPC
It is believed that these stand for Black Pixel Correction and White Pixel Correction. That is to say, if an image pixel is defective and outputs either white (always on) or black (never on), then the camera will fudge nearby pixels in order to hide this.
On a normal, working, camera sensor, turning these options on and off will make no discernable difference.
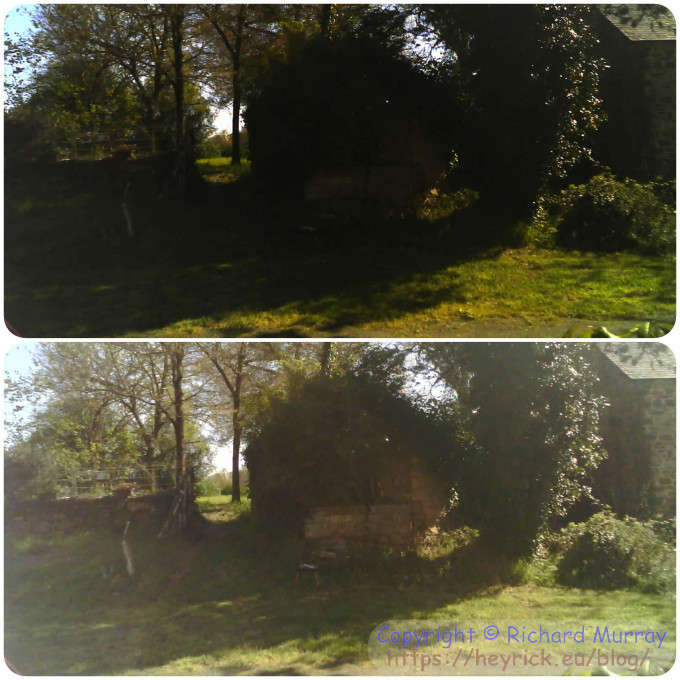
Raw GMA
I have no idea what Raw GMA actually means, suffice to say that in use it lightens up the image which brings out a lot of details. The pictures on this page were taken with AEC DSP and Raw GMA both turned on.
In the example below, Raw GMA off is at the top, and Raw GMA on is below. I'm sure you'll agree that On gives a much more pleasing image.
Raw GMA examples.
Lens Correction
No idea, to be honest. It doesn't compensate for pincushioning or anything. When looking at a stream, turning if off appears to briefly darken the image and turning it on appears to briefly lighten the image, before the AEC brings the image back to what it was before.
In other words, in a daytime test, this didn't appear to make any difference.
H-Mirror and V-Flip
H-Mirror will flip the image so left and right are reversed, while V-Flip will reverse top and bottom.
These may be useful if the camera is mounted upside down, to switch the image to be the right way up.
DCW (Downsize EN)
When DCW is on, the image that you receive will be the size that you requested (VGA, QQVGA, etc).
When DCW is off, the image that you receive will be one of UXGA, SVGA, or CIF. In other words, literally the actual image size as read from the sensor without any scaling.
Note that if DCW is off, and you pick a different image size, this implicitly turns DCW back on again (although this isn't reflected in the options).
Colour Bar
This does exactly what it says on the tin.
Colour bar example.
Face Detection, Face Recognition, and Enroll Face
These are supposed to enable the camera's automatic detection of faces. I say "supposed to" as this does not work on my device. Apparently some board and/or Arduino IDE combinations are problematic.
Suffice to say, you switch to a low resolution and start the stream. Tapping on Enroll Face should cause the device to take five snapshots of the face visible on the screen. It will then be able to detect the face (with a yellow border around it) and say a message in green if the face is recognised, or "Intruder alert!" in red if it is not. I believe it can also control GPIO so that a recognised face could, for example, activate a lock. Or maybe a siren for an unrecognised face?
Get Still
Will take a picture and return it as a JPEG.
Start Stream or Stop Stream
This will start and stop the "video stream". I put video stream in quotes like that, because it is actually a MIME-separated series of JPEGs. It is not a valid MJPEG stream, so don't expect anything like MPlayer or VLC to know what to do with the data.
There. I hope this helps to clear up some of the many bewildering options offered by the ESP32-CAM's default firmware.
Strangely, there doesn't seem to be any option to turn the flash LED on and off...
Your comments:
Please note that while I check this page every so often, I am not able to control what users write; therefore I disclaim all liability for unpleasant and/or infringing and/or defamatory material. Undesired content will be removed as soon as it is noticed. By leaving a comment, you agree not to post material that is illegal or in bad taste, and you should be aware that the time and your IP address are both recorded, should it be necessary to find out who you are. Oh, and don't bother trying to inline HTML. I'm not that stupid! ☺ As of February 2025, commenting is no longer available to UK residents, following the implementation of the vague and overly broad Online Safety Act. You must tick the box below to verify that you are not a UK resident, and you expressly agree if you are in fact a UK resident that you will indemnify me (Richard Murray), as well as the person maintaining my site (Rob O'Donnell), the hosting providers, and so on. It's a shitty law, complain to your MP. It's not that I don't want to hear from my British friends, it's because your country makes stupid laws.
You can now follow comment additions with the comment RSS feed. This is distinct from the b.log RSS feed, so you can subscribe to one or both as you wish.
Zerosquare, 18th April 2021, 23:46
Skipping pixels can introduce aliasing artifacts, but shouldn't change the colour balance like that. Something else must be going on, probably different encoding parameters depending on the picture size.
On the other hand, even on the full-size, full-quality picture, it's pretty evident that it's using a 16-year old technology.
Rick, 18th April 2021, 23:48
Hmm, it looks like I might have my Gain pictures back to front. Not a surprise, mind you, it is hard to edit mostly dark pictures in sunlight! 😉
David Pilling, 19th April 2021, 23:16
Duuno. You could do things like look at the histograms for the image for different (RGB) colours for different resolutions. Or look at the R, G and B versions of the image to see if you can work out what they're doing (wrong). The general theme this chimes with for me, is how grim results are from many low cost cameras. I even did not like the RasPi one. Presumably at some point phone camera technology will escape into other products and things will improve. Many are still using the first generation technology from way back, all the improvements come from telling bigger fibs in the specifications.
David Pilling, 23rd April 2021, 18:40
Cameras have more green than other colour pixels - don't suppose they are using a scaling algorithm for RGB on RGGB data.
Jaggz, 2nd August 2021, 09:56
Lens Correction: I noticed in low light conditions, when the brightness fades out towards the edges, it seems it does a radial gain increase, evening out the brightness across the whole image.
Jaggz, 2nd August 2021, 10:15
About the Exposure slider not offering enough control -- Users can use the http API to set values directly. (I'm not sure which setting though; never done it). Docs here (if you're using his fork of Expressif's sketch): https://github.com/easytarget/esp32-cam-webserver/blob/master/AP I.md
Leonardo, 9th May 2022, 17:31
RAW GMA enable the gamma correction in the RAW image domain, you can read more about this in the OV5640 datasheet.
Lens correction is to compensate for uneven brightness of the lens, so will reduce vigneting.
Exposure is the exposure time. If the subject is still is always better to increase the exposure time than the Gain.
You can improve A LOT colors by applying a CCM with a software like Color Corrector (available on the MS Store)
corz, 14th April 2023, 21:15
Thank you. I'll be linking to this.
It feels incomplete though. Lots of "this happens when in daylight" but no mention of the same setting after dark.
At any rate, still the best online explanation of those mysterious ESP32-CAM settings.
btw, if you want to mess with the sliders and what-not, start with a better sketch, like this one (nothing to do with me, but provides plain HTML pages to work with): https://github.com/easytarget/esp32-cam-webserver
Rick, 15th April 2023, 10:35
To be honest, it's a camera sensor from 2005, so not a lot happens in the dark. You can make some use of gain and exposure to enhance things in low light, but both add noticeable (exposure) or massive (gain) amounts of noise. In this case you'd likely need to take multiple pictures and stack them, but the hassle of doing that might make it not worthwhile when you consider that any mid-range 202x smartphone can do so much better.
Two years later (2023/03/26) I finally got around to revising the camera firmware, and had the thing allocate a much bigger buffer so photos up to around 720K are possible (that's quality level 4 or 5).
More recently, I've been creating firmware to do time lapse photography.
corz, 29th July 2023, 10:12
Hah! I was doing the exact same thing myself. See here: https://corz.org/ESP32/time-lapse-camera-server/
Rick, 29th July 2023, 11:31
From Corz's site: they just don't make them like they used to
Halle-freaking-lujah. D'you think I would have taken out an additional warranty *and* an insurance policy on an expensive (to me) washing machine bought in 1982? Our one (a Zanussi) saw me through school, came over here, and finally gave up the ghost (controller short circuit) a quarter century later. The little machine I found in a cow barn was easily fixed up (two caps and minor rewiring) and it served me for a year and a half despite being prehistoric when I got it (circa 1995 I think).
Will I get a quarter century out of my new Whirlpool? I can but hope. And given its all computer controlled gubbinses inside, hope is aided with a monthly subscription...
corz, 29th January 2024, 00:07
Hell yes!
Reminds me of "Philip", our washing machine for over two decades and the first time I ever completely disassembled a motor (about 15 years in to his faithful service).
These cheap little devices really are perfect for slamming in-situ-without-worry. But yeah, ten years from now they will be useless clutter in the bottom a drawer somewhere as we gobble up the next generation of disposable tech. Ahhh...
But while we are *here*, this page is indispensable (as I forget stuff easily); thanks again!
This web page is licenced for your personal, private, non-commercial use only. No automated processing by advertising systems is permitted.
RIPA notice: No consent is given for interception of page transmission.