It is the 1876th of March 2020 (aka the 19th of April 2025)
You are 3.147.44.41,
pleased to meet you!
mailto:blog-at-heyrick-dot-eu
Ray Casting 3 - wall textures
Looking at coloured walls is okay, but not terribly interesting.
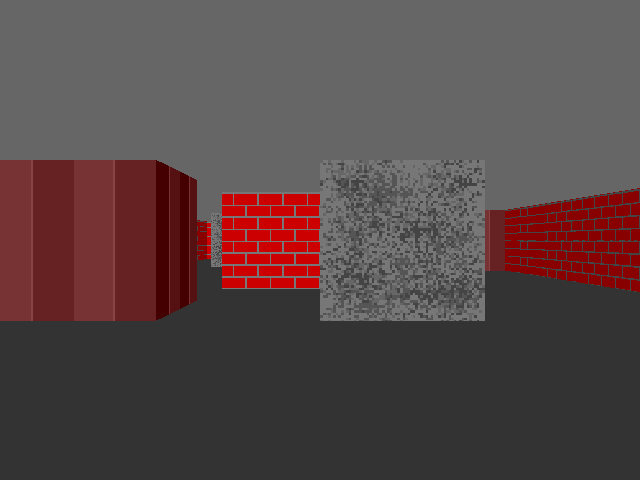
How about if we could look at something like this instead?
Walls with textures.
It's actually not that hard. But if we're using pure BASIC, kiss goodbye to any hint of a useful redraw speed.
The first thing we need is to have some textures. I have chosen to use a set of 64×64 sprites. These are named a, b, and c to correspond to the three different "colours". The names are suffixed with either x or y depending if it's the brighter one (x) or the dimmer one (y).
The three textures are a brick-like, sort-of concrete, and something that's a bad impression of wood panelling. It took literally ten minutes in Paint to do this. ☺
ax
bx
cx
ay
by
cy
After allocating memory for the triple buffering, but before setting up the screen and banking, insert this code to load the textures.
REM Now load the texture sprites
SYS "XOS_File", 23, "<RayCast3$Dir>.textures" TO ,,,,len% ; f%
IF (f% AND 1) THEN ERROR 123, "Cannot find textures."
len% += 4
DIM texture% len%
texture%!0 = len%
texture%!8 = 16
SYS "OS_SpriteOp", ( 9 + 256), texture%
SYS "OS_SpriteOp", (10 + 256), texture%, "<RayCast3$Dir>.textures"
Now everything is as normal until we get to the part that selects the colours and draws the lines to the screen. This part:
    REM Now work out what colours we want
    col% = 127
    IF (side% = FALSE) THEN col% += 128
    CASE map%(mapx%, mapy%) OF
      WHEN 1 : GCOL col%, 0, 0 : REM Red
      WHEN 2 : GCOL 0, col%, 0 : REM Green
      WHEN 3 : GCOL 0, 0, col% : REM Blue
    ENDCASE


    REM And, finally, draw the line, with correction between
    REM OS units and pixels for MODE 28.
    MOVE (scrcol% << 1), (drawbot% << 1)
    DRAW (scrcol% << 1), (drawtop% << 1)
We're going to replace that with some new code.
It's a little involved, so let's look at it in steps.
The first part works out which texture we want - the first letter being a, b, or c and the second letter being x or y.
    REM Which texture are we using?
    CASE map%(mapx%, mapy%) OF
      WHEN 1 : text$ = "a"
      WHEN 2 : text$ = "b"
      WHEN 3 : text$ = "c"
    ENDCASE
    IF (side% = FALSE) THEN
      text$ = text$ + "x"
    ELSE
      text$ = text$ + "y"
    ENDIF
    REM At this point, we'll have a texture name like
    REM "ax" or "by" for which wall type and whether
    REM it's an X or Y intersection.
Now we need to work out exactly where along the wall the ray has hit. We then subtract this from the integer of itself so we're left with only the part after the decimal point. This tells us how far along the texture we are (a value from 0 to 1).
    REM Now we need to know where along the wall it was hit
    IF ( side% = FALSE) THEN
      wallpos = oury + (towall * yray)
    ELSE
      wallpos = ourx + (towall * xray)
    ENDIF
    REM Now clip it to be only the offset into the wall piece
    wallpos = wallpos - INT(wallpos)
    REM Now wallpos is a value from 0 to 1
Now we work out how this maps to pixels in the actual texture, and we also conditionally flip the offset so walls drawn on the opposite side still draw the right way around (otherwise they'd appear back to front).
    REM Now work out where this actually is in the texture
    textxpos% = wallpos * 64
    REM Now flip it if necessary so the opposite sides draw correctly
    IF ((side% = FALSE) AND (ydir < 0)) THEN textxpos% = 64 - textxpos% - 1
    IF ((side% = TRUE ) AND (xdir > 0)) THEN textxpos% = 64 - textxpos% - 1
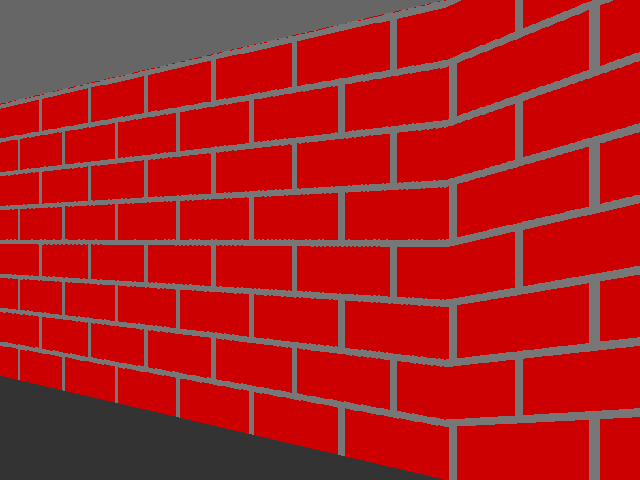
That's the X offset sorted out. How time to sort out the Y stepping and initial offset. If you're wondering why we don't just set the initial Y offset to zero, the reason is that while this will work for the majority of wall drawing, as soon as you get close to a wall, it'll go wonky.
Wonky walls.
The way to prevent this is to work out how much wall is actually visible and set the initial offset accordingly so drawing begins from the right place.
    REM Now we have the X offset sorted, we need to step through
    REM the Y for drawing the slice of the textured wall

    REM Work out how many pixels we step in the texture for
    REM each on-screen pixel
    textstep = 1 * (64 / drawsize%)

    REM The initial Y offset into the texture
    texty = (drawbot% - (height% / 2) + (drawsize% / 2)) * textstep
Now we simply simply step through the individual pixels involved in drawing the line, and pluck out which pixel of the texture to actually plot to the screen.
    FOR yloop% = drawbot% TO drawtop%
      textypos% = INT(texty) AND 63

      REM Read the colour
      SYS "OS_SpriteOp", (41 + 256), texture%, text$, textxpos%, textypos% TO ,,,,,c%,t%

      REM Plot this pixel
      GCOL c% TINT t%
      POINT (scrcol% << 1), (yloop% << 1)

      texty = texty + textstep
    NEXT
Doing this with the commented source might get you a single frame per second if you're lucky. Crunching doesn't help. And compiling only helps a little, because you've just dropped in at least thirty thousand SWI calls per redraw (if you're right up against a wall, it's more like three hundred thousand!).
Not good.
We can do a little better, but this means fiddling with memory directly now.
After this part:
WHILE TRUE
  PROCswitchbank
  CLS
Insert this:
screen% = VDU(148)
This will read the base address of the current draw screen bank.
Now replace the drawing loop (the read colour, plot pixel) with this:
    REM Now get a pointer to the sprite data
    SYS "OS_SpriteOp", (24 + 256), texture%, text$ TO ,,address%
    address% = address% + address%!32 : REM Pointing to the data now

    FOR yloop% = drawbot% TO drawtop%
      textypos% = INT(texty) AND 63

      col% = address%?( (textypos% * 64) + textxpos% )
      screen%?( (yloop% * width%) + scrcol% ) = col%

      texty = texty + textstep
    NEXT
This does the same thing, but instead of making loads of SWI calls, we only do one to get the base address of the desired sprite, that we then correct to point to the pixel data instead of the sprite header.
Then we simply read a byte from the sprite pixel data and write it to the screen memory in the correct position.
This relies upon both the sprite and the screen being 8bpp (or one byte per pixel) and both using the same colour palette.
The uncompresseed BASIC will run at 4-5fps (on my Pi3B+), going up to 6-7fps for a crunched version. Sadly, it's a lot of fiddly work so this is really stretching BASIC.
The ABC compiler, on the other hand, can maintain around 30fps (and sometimes twice that, no throttling remember?).
Accordingly, this amount of number crunching makes a good use case for the ABC compiler, and given that it is built using VFP instructions, it may well be able to outdo the DDE C compiler!
If you are interested in using the BASIC compiler but don't have the DDE, send an email to David Feugey at abc@riscos.fr along with a screenshot of your RISC OS desktop (blank out
any personal information as the screenshots are published on the website).
See https://www.riscosopen.org/forum/forums/1/topics/9003 for more details.
Now, grab the programs (Zip, 14,880 bytes) and begin playing with them.
Potential optimisations:
Precalculate the offsets of the six different textures, and then use the logic to select which one is to be drawn.
Cache the current pixel and only read it if the Y position has changed?
Cache a sliver of pixels and replicate them if the X position is the same?
(do this in a group of four for word writes?)
And, of course... strip out all the floating point code and replace with fixed point maths using integers. ;)
These optimisations are, of course, up to you.
Your comments:
Please note that while I check this page every so often, I am not able to control what users write; therefore I disclaim all liability for unpleasant and/or infringing and/or defamatory material. Undesired content will be removed as soon as it is noticed. By leaving a comment, you agree not to post material that is illegal or in bad taste, and you should be aware that the time and your IP address are both recorded, should it be necessary to find out who you are. Oh, and don't bother trying to inline HTML. I'm not that stupid! ☺ As of February 2025, commenting is no longer available to UK residents, following the implementation of the vague and overly broad Online Safety Act. You must tick the box below to verify that you are not a UK resident, and you expressly agree if you are in fact a UK resident that you will indemnify me (Richard Murray), as well as the person maintaining my site (Rob O'Donnell), the hosting providers, and so on. It's a shitty law, complain to your MP. It's not that I don't want to hear from my British friends, it's because your country makes stupid laws.
You can now follow comment additions with the comment RSS feed. This is distinct from the b.log RSS feed, so you can subscribe to one or both as you wish.
This web page is licenced for your personal, private, non-commercial use only. No automated processing by advertising systems is permitted.
RIPA notice: No consent is given for interception of page transmission.