It is the 1817th of March 2020 (aka the 19th of February 2025)
You are 3.145.165.39,
pleased to meet you!
mailto:blog-at-heyrick-dot-eu
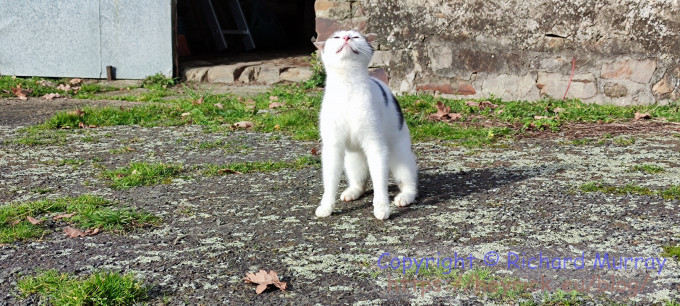
A nice sunny afternoon
Up the lane, I could see white smoke belching from the chimney.
It made it up to 11.5°C, so I had the doors and windows open. I also sawed off a few unwanted branches, and walked furball, who wanted to explore and sniff everything in case it was different to how it was yesterday.
Anna.
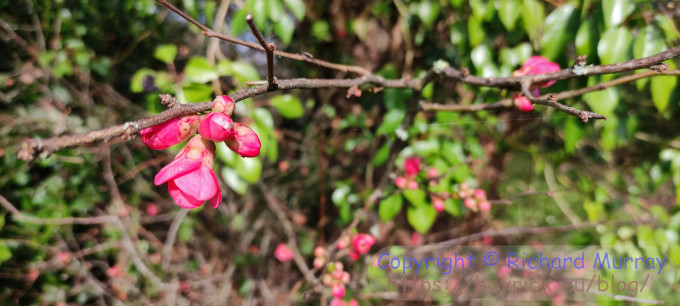
I got a better picture of the Japonica, what with the sun on it this time.
Japonica, in the sun.
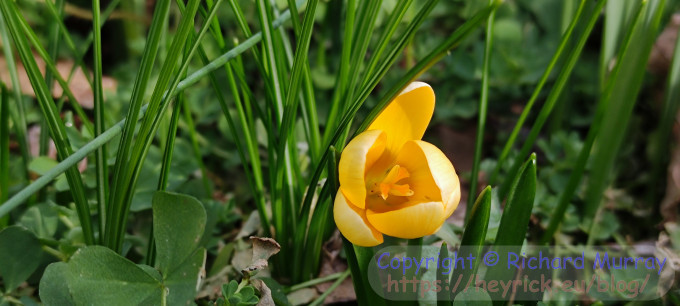
And the Crocus (?) has opened, the first of the bulbs to flower.
A splash of yellow.
Revising my toolbox
As I had to be in the kitchen while I had the front and back doors open (to ensure nothing furry snuck in), I decided to revise my toolbox. Clean it, organise it.
Really, I think I need a bigger toolbox these days, but for now...
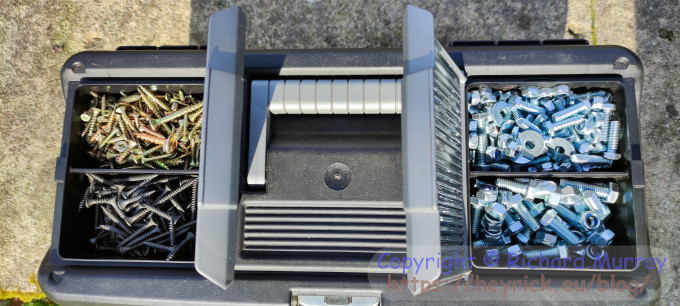
The lid. Screws on one side, bolts on the other.
Easy access to screws and bolts.
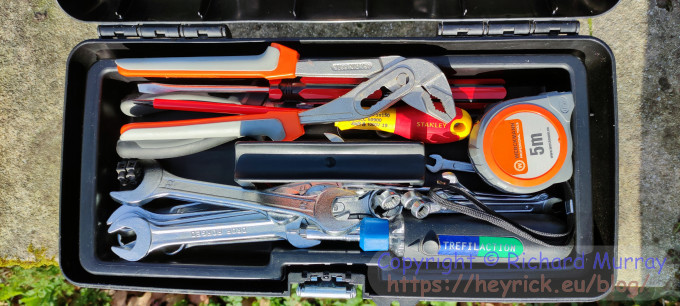
The tray. Mainly screwdrivers and spanners.
Screwdrivers and spanners.
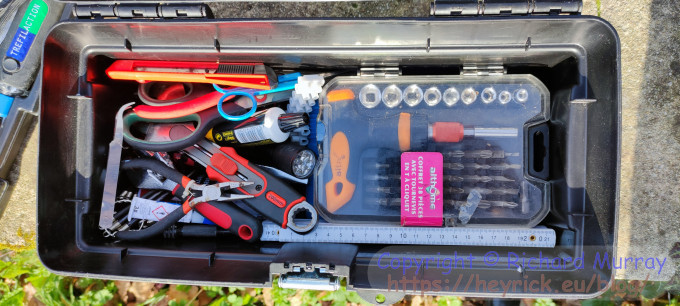
And inside, the "everything else" part. Underneath the rachet screwdriver (on the right) is the blue box with all the various types of odd little pieces for when something has an unusual screw attached.
All the other stuff.
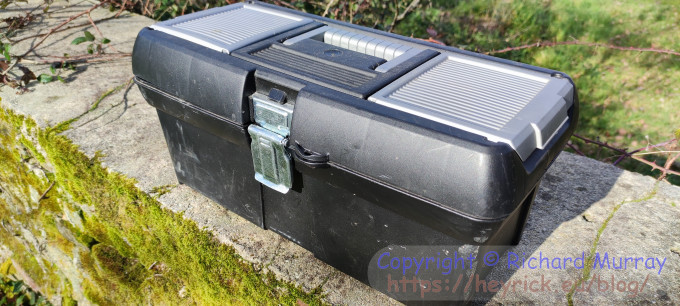
Thanks to reorganising everything (and cleaning it up too), the toolbox closes again. Always useful!
My toolbox.
Sorry. If you were thinking some sort of programming aid... nope, it's a real toolbox. 😛
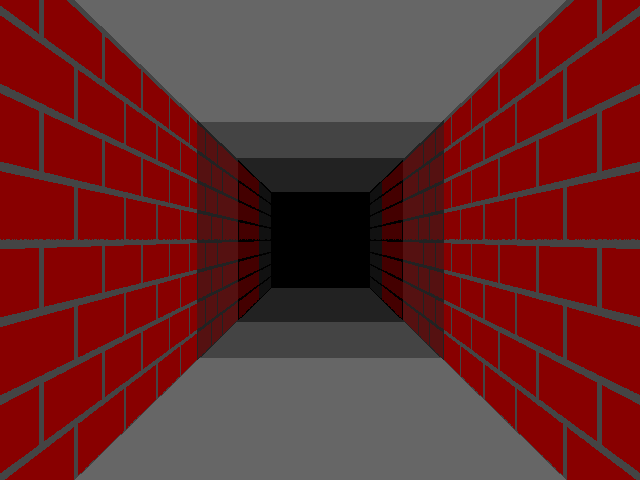
Something that can add ambience to the raycaster is to implement "fading". That is to say, things further away from you are darker until it's just black.
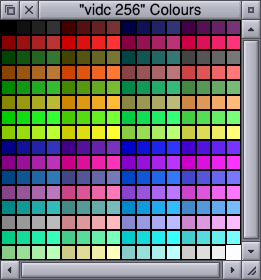
Now, we are greatly limited by being in a 256 colour mode and the VIDC's arcane colour system that actually provides four different tints of 64 colours. That's why the default palette for 256 colour sprites in Paint looks like this:
VIDC 256 colour palette.
The colour is written into screen memory as two bits of red, two bits of green, two bits of blue, and two tint bits. This provides 64 distint colours, with the tint value being the least significant two bits. What this results in is a distinct colour followed by a bright, brighter, and brightest version. You can clearly see this in the Paint palette.
What this means is that there aren't really smooth graduations as a colour fades to dark. Red, for example, goes bright red to dull red to dark red to a sort of brown. I guess it's the stages of drying blood. ☺
This leads to something like this:
A scene with fading.
How it works is simple. We build a table that contains 256 × 8 entries. Then we break down each colour into it's component parts (red, green, and blue). We then populate this table with colour entries with subscript 0 being the normal colour, subscript 1 being slightly darker, and so on until subscript 7 which is probably black.
This chunk of code goes at the top between setting up triple buffering memory and loading the texture sprites.
REM Set up the fade mapping
DIM fade%(256, 8)
FOR fadeloop% = 0 TO 255
  REM Break the colour byte down into an R, G, B tuplet.
  REM b7=BH, b6=GH, b5=GL, b4=RH, b3=BL, b2=RL, b1=TH, b0=TL
  colour% = fadeloop%
  tnt% = colour% AND 3
  red% = ( ((colour% >> 2) AND 1) + (((colour% >> 4) AND 1) << 1) << 2 ) + tnt%
  grn% = ( ((colour% >> 5) AND 1) + (((colour% >> 6) AND 1) << 1) << 2 ) + tnt%
  blu% = ( ((colour% >> 3) AND 1) + (((colour% >> 7) AND 1) << 1) << 2 ) + tnt%

  REM Now translate the palette to colour numbers getting progressively darker
  FOR darkloop% = 0 TO 7
    palette% = (blu%<<28)+(blu%<<24) + (grn%<<20)+(grn%<<16) + (red%<<12)+(red%<<8)

    SYS "ColourTrans_ReturnColourNumber", palette% TO fadecol%
    fade%(fadeloop%, darkloop%) = fadecol%

    red% -= 2
    grn% -= 2
    blu% -= 2
    IF (red% < 0) THEN red% = 0
    IF (grn% < 0) THEN grn% = 0
    IF (blu% < 0) THEN blu% = 0
  NEXT
NEXT
Okay, so to explain this. The first bunch of shifting is to extract the individual bits for the colour from the byte written into screen memory. This is the COLOUR value, and it's not the same as the GCOL value. Useful, huh?
It is laid out like this:
Bit
7
6
5
4
3
2
1
0
Meaning
Blue (high)
Green (high)
Green (low)
Red (high)
Blue (low)
Red (low)
Tint (high)
Tint (low)
This means each of the red, green, and blue have fifteen possibilities, a nibble. It is comprised of two bits for the amount of colour, that are the two most significant bits; and two bits of intensity (the "tint"), that are the two least significant bits.
The colours are not linear. The two bits for the amount of colour provide four potential values, which are defined as 0%, 26%, 53%, and 80% of the full colour. The tint then adds in 0%, 6%, 13%, or 20% of "whiteness" to brighten the colour.
Thus pure white is 80% of red, 80% of green, and 80% of blue, with 20% of whiteness added. Or 100% white in total.
I then combine these into a palette entry that is a 32 bit word laid out in the format &BBGGRR00. On the old machines, there was no difference between &F0F0F000 and &FFFFFF00 as the hardware only used the upper nibble, however it's good practice to duplicate the value into the lower nibble as well. That's why palette% is built in such a peculiar way.
Each time through, '2' is subtracted from the value placed in the palette entry. It's a little course, but allows a fairly quick fade to black. Of course, we clip it so anything that would be less than zero amount of colour rests as zero amount of colour.
While we're making mods, the map has been expanded. Replace the map code with this.
REM The size of the 2D map
mapx% = 47
mapy% = 16
DIM map%(mapx%, mapy%)
FOR loopy% = 15 TO 0 STEP -1
  FOR loopx% = 0 TO 46
    READ map%(loopx%, loopy%)
  NEXT
NEXT

REM 0 = Empty
REM 1 = Brick
REM 2 = Stone square
REM 3 = Wood square
DATA 1,1,1,1,1,1,1,1,1,1,1,1,1,1,1,1,1,1,1,1,1,1,1,1,1,1,1,1,1,1,1,1,1,1,1,1,1,1,1,1,1,1,1,1,1,1
DATA 1,0,0,0,0,0,0,0,0,0,0,0,0,0,0,0,0,0,0,0,0,0,0,0,0,0,0,0,0,0,0,0,0,0,0,0,0,0,0,0,0,0,0,0,0,0
DATA 1,0,0,2,2,2,2,2,2,2,2,2,2,2,2,2,2,2,2,2,2,2,2,2,2,2,2,2,2,2,2,2,2,2,2,2,2,2,2,2,2,2,2,2,0,0
DATA 1,0,0,2,0,0,0,0,0,0,0,0,0,0,0,0,0,0,0,0,0,0,0,0,0,0,0,0,0,0,0,0,0,0,0,0,0,0,0,0,0,0,0,0,0,0
DATA 1,0,0,2,0,2,0,0,1,2,2,2,2,2,2,2,2,2,2,2,2,2,2,2,2,2,2,2,2,2,2,2,2,2,2,2,2,2,2,2,2,2,0,0,0,2
DATA 1,0,0,2,0,2,0,0,1,0,0,0,0,0,0,0,0,0,0,0,0,0,0,0,0,0,0,0,0,0,0,0,0,0,0,0,0,0,0,0,0,2,0,0,0,2
DATA 1,0,0,2,0,2,0,0,1,0,0,0,0,0,0,0,0,0,0,0,0,0,0,3,0,3,0,0,0,0,0,0,2,0,0,0,0,0,2,0,0,2,0,0,0,2
DATA 1,0,0,2,0,2,0,0,1,0,0,3,3,3,3,3,3,3,3,0,0,3,3,0,0,3,0,0,0,2,0,0,0,0,0,2,0,0,0,0,0,2,0,0,0,2
DATA 1,0,0,2,0,2,0,0,1,0,0,3,0,0,0,0,0,0,3,3,3,3,0,0,3,0,0,0,0,0,0,0,2,0,0,0,0,0,2,0,0,0,0,0,0,2
DATA 1,0,0,2,0,2,0,0,1,0,0,3,0,0,0,0,0,0,0,0,0,0,0,3,0,0,0,0,0,2,0,0,0,0,0,2,0,0,0,0,0,2,0,0,0,2
DATA 1,0,0,2,0,2,0,0,1,0,0,3,0,0,0,0,0,0,3,3,3,3,3,0,0,0,0,0,0,0,0,0,2,0,0,0,0,0,2,0,0,2,0,0,0,2
DATA 1,0,0,2,0,2,0,0,1,0,0,3,0,3,3,3,3,3,3,0,0,0,0,0,0,0,0,0,0,2,0,0,0,0,0,2,0,0,0,0,0,2,0,0,0,2
DATA 1,0,0,2,0,2,0,0,1,0,0,0,0,0,0,0,0,0,0,0,0,0,0,0,0,0,0,0,0,0,0,0,0,0,0,0,0,0,0,0,0,0,0,0,0,2
DATA 1,0,0,2,0,2,0,0,1,1,1,1,1,1,1,1,1,1,1,1,1,1,1,1,1,1,1,1,1,1,1,1,1,1,1,1,1,1,1,1,1,1,1,1,0,0
DATA 1,0,0,0,0,2,0,0,0,0,0,0,0,0,0,0,0,0,0,0,0,0,0,0,0,0,0,0,0,0,0,0,0,0,0,0,0,0,0,0,0,0,0,0,0,0
DATA 1,1,1,1,1,1,1,1,1,1,1,1,1,1,1,1,1,1,1,1,1,1,1,1,1,1,1,1,1,1,1,1,1,1,1,1,1,1,1,1,1,1,1,1,1,1
REM                                                                                         /|\
REM                                                                                          |
REM                                           Viewer is here, second row up. looking to the LEFT.
And because of this, the start position is altered accordingly. This is a few lines below the map. Alter accordingly.
REM Where in the map does the viewer start?
ourx = 44
oury = 1.5
The background (ceiling/floor) redraw has been altered to provide a fade effect. It's crap, it would probably be better to do this as a dithered set of rectangles (using ColourTrans to dither with ECFs), grab that as a sprite, and then sprite-plot each time to save having to churn through all the drawing.
But for now, I just iterate through the colours and poke the values directly into screen memory for amounts that look "visually correct". It was done using trial and error. Feel free to implement something better. ☺
The (ColourTrans) GCOL and RECTANGLE FILL to draw the floor and ceiling should be replaced with this crap...
  newcol% = fade%(46, 0)
  newcol% = newcol% + (newcol% << 8)
  newcol% = newcol% + (newcol% << 16)
  FOR plotloop% = 0 TO 78076 STEP 4
    screen%!plotloop% = newcol%
  NEXT
  FOR plotloop% = 229124 TO 307196 STEP 4
    screen%!plotloop% = newcol%
  NEXT
  newcol% = fade%(46, 1)
  newcol% = newcol% + (newcol% << 8)
  newcol% = newcol% + (newcol% << 16)
  FOR plotloop% = 78080 TO 101120 STEP 4
    screen%!plotloop% = newcol%
  NEXT
  FOR plotloop% = 206084 TO 229124 STEP 4
    screen%!plotloop% = newcol%
  NEXT
  newcol% = fade%(46, 2)
  newcol% = newcol% + (newcol% << 8)
  newcol% = newcol% + (newcol% << 16)
  FOR plotloop% = 101120 TO 122880 STEP 4
    screen%!plotloop% = newcol%
  NEXT
  FOR plotloop% = 184320 TO 206080 STEP 4
    screen%!plotloop% = newcol%
  NEXT
Before the floor was darker, but it has been made the same as the ceiling as it faded out much sooner. Like I said, it's an idea, it's not perfect.
The direct pokage, instead of using rectangle plotting (which would be simpler to write) is partly for speed, and partly because the values in the array are the values actually written into screen memory. If we were going to use rectangles, we'd need to fudge these values into GCOL values or palette entries in order to pass them to the OS.
A quick bug fix. I fixed this for yesterday's code, but I forgot to mention it. Anyway, the idea was that opposite sides of textures were drawn back to front so something looks the same regardless of what side you're looking at. However I screwed up the maths, so if you faced a block and rotated from looking at the left corner to the right corner, halfway along it would flip. Oops, that's not right!
Here's the correct code.
    REM Now flip it if necessary so the opposite sides draw correctly
    IF ((side% = FALSE) AND (xdir > 0)) THEN textxpos% = 64 - textxpos% - 1
    IF ((side% = TRUE ) AND (ydir < 0)) THEN textxpos% = 64 - textxpos% - 1
To perform the actual fading, there are two additions to make. The first of this should be inserted after getting a pointer to the sprite data.
    REM Work out and fudge the distance to the wall for fading
    walldist% = INT(towall) - 1
    IF (walldist% < 0) THEN walldist% = 0
    IF (walldist% > 7) THEN walldist% = 7
What we're doing here is working out how far away from we are. The -1 gives us a little more that we can 'see' before it starts to fade. This is then clipped to be in the range 0 to 7 to fit the array.
The other part is placed after the code to read a byte from the sprite data, and before writing it to the screen. Just insert this.
      REM Apply fading
      col% = fade%(col%, walldist%)
Yup, it's really that simple. We use the colour byte to look up the colour byte according to it's distance. If it's array entry (col%, 0) then it'll be the colour. If it's (col%, 7) then it'll be black. In between, what ColourTrans thinks is progressively darker versions of the base colour.
Note that as this is done column by column, it is possible for a texture to change intensity partway along as it strays into being further away.
Another little addition, we'll permit holding down Shift whilst pressing Up to let us run. Change the UP code to be this.
  REM UP
  IF ( FNkey(57) ) THEN
    IF ( FNkey(0) ) THEN
      REM Shift-Up = run forwards
      IF ( map%(ourx + (xdir * 0.1), oury) = 0 ) THEN ourx += xdir * 0.2
      IF ( map%(ourx, oury + (ydir * 0.1)) = 0 ) THEN oury += ydir * 0.2
    ELSE
      REM Up (no Shift) = walk forwards
      IF ( map%(ourx + (xdir * 0.1), oury) = 0 ) THEN ourx += xdir * 0.1
      IF ( map%(ourx, oury + (ydir * 0.1)) = 0 ) THEN oury += ydir * 0.1
    ENDIF
  ENDIF
And, finally, we can use the Shift trick to allow faster turning. Backtrack a little (as the turn code is just before the UP code), and after the line that sets rot to either 0.05 or -0.05, insert this.
IF FNkey(0) THEN rot = rot * 2
Now, grab the programs (Zip, 18,296 bytes) and begin playing with them.
And finally, a video of the raycaster in use.
Your comments:
Please note that while I check this page every so often, I am not able to control what users write; therefore I disclaim all liability for unpleasant and/or infringing and/or defamatory material. Undesired content will be removed as soon as it is noticed. By leaving a comment, you agree not to post material that is illegal or in bad taste, and you should be aware that the time and your IP address are both recorded, should it be necessary to find out who you are. Oh, and don't bother trying to inline HTML. I'm not that stupid! ☺ As of February 2025, commenting is no longer available to UK residents, following the implementation of the vague and overly broad Online Safety Act. You must tick the box below to verify that you are not a UK resident, and you expressly agree if you are in fact a UK resident that you will indemnify me (Richard Murray), as well as the person maintaining my site (Rob O'Donnell), the hosting providers, and so on. It's a shitty law, complain to your MP. It's not that I don't want to hear from my British friends, it's because your country makes stupid laws.
You can now follow comment additions with the comment RSS feed. This is distinct from the b.log RSS feed, so you can subscribe to one or both as you wish.
David Pilling, 6th February 2023, 15:23
"Manly screwdrivers and spanners." I'm dyslexic. I have two toolboxes...
Rick, 6th February 2023, 17:59
Well, your misread does make sense. "Manly screwdrivers and spanners" would probably appeal to the sort of person that would have watched Top Gear.
But my tools are small, so probably wouldn't count as manly. ;)
J.G.Harston, 11th February 2023, 04:09
I bought my seed potatoes a couple of days ago, so it's almost Spring. I also bought some onion sets this time instead of repeating the failure of trying to grow from seed.
VinceH, 12th February 2023, 17:31
Looking forward to the game you're going to base on this. ;)
Or should that be :p ?
Rick, 12th February 2023, 19:28
No plans for a game, it's more an exercise in "how does this work?".
This web page is licenced for your personal, private, non-commercial use only. No automated processing by advertising systems is permitted.
RIPA notice: No consent is given for interception of page transmission.