It is the 1739th of March 2020 (aka the 3rd of December 2024)
You are 3.14.132.43,
pleased to meet you!
mailto:blog-at-heyrick-dot-eu
A full day time lapse
I wanted to write this yesterday, but I was ill. A hundred trips to the toilet and generating enough methane to wreck my carbon footprint for the rest of my life.
No idea what caused it. It was long (all day) but not particularly painful, so maybe too much sun? I don't know. I mean, it wasn't that hot for frig's sake! Perhaps one of those tummy bugs that goes around?
Anyway, half the day I slept and the other half, don't ask.
Well, the weather was crap so... just not the ideal way to lose weight. ☺
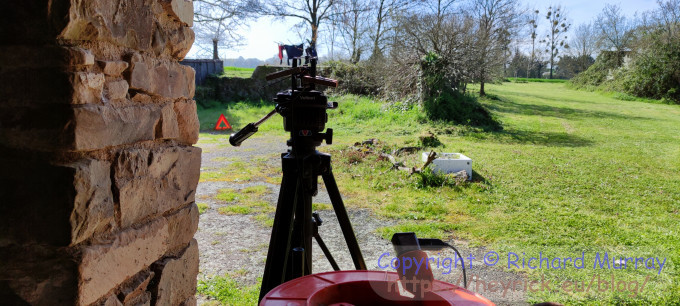
On Sunday, around what I was doing, I set up the time lapse camera on a tripod to look out of the end door of the barn.
The LapseCam set up.
The outdoor extension lead was put in place to run the camera from my Samsung phone charger (the first USB thingy I picked up). As the serial lead was short, I put the extension lead on top of my knock-off workmate, and clipped the ESP32-CAM board in place using two clothes pegs, like this...
What the LapseCam 'sees'.
I didn't get to do any test runs as inserting/removing the µSD card would likely cause it to move. So I was recording blind. Really, the entire capture area should have been a little more to the right (more field, less crap). But, you know...
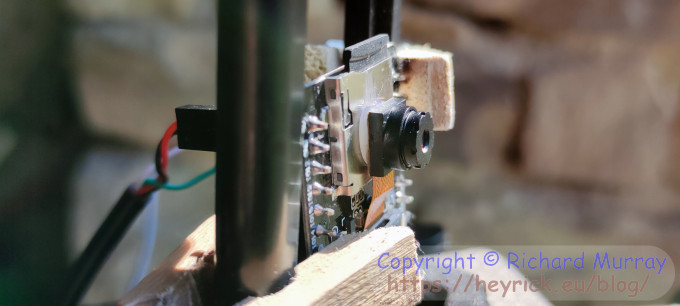
To stop the camera moving, I found my hot-melt-glue gun and stuck the thing in place.
The camera module glued in place.
Of course, I had to be careful not to be in the picture at any time. Which meant I had to creep close to the barn wall and wait until the flash LED blinks (when writing to SD card) which means I can count of fifty seconds before have to avoid it again. Fifty, not sixty, so it doesn't matter if I'm a little slow.
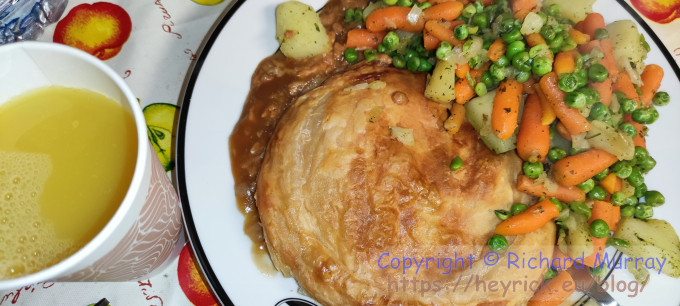
Later on, I had dinner which was stir-fry veg and a Fray Bentos, along with pineapple juice.
This isn't what made me ill, I was feeling a little odd beforehand which I put down to being hungry. Yeah... it wasn't hunger. Oh well.
Veg and Fray Bentos.
Here, then, is the video. From 6.30am to 9.30pm, it spans fifteen hours or 900 frames. As before, one frame per minute and running at 15fps to give one minute of video. As I wasn't sure how the difference in scene would affect the video, I knocked the quality back to 17, with a frame size of 1280×1024. This gave me 80.9MB of imagery which FFMPEG made into a 44.41MB video. Any worries I might have had about the lower video quality was answered by YouTube that converted the 1280×1024 video into 720p and... 12.04MB. For some bizarre reason the other available options on my video are 360p (2.76MB) and 144p (718.28KB). What happened to the 480p option?
The reason I used the odd SXGA frame size is because I didn't want to use the full 1600×1200 because the images would be (1.92 million pixels versus 1.3 million for the size I used), but I wanted it to be over 800×600 in order that the camera use all of its pixels. If you use SVGA, it'll use every other pixel which gives inferiour colour reproduction.
The glowing blob at the beginning is Luna. Remember, it's a photo every minute. It really does move that quickly.
At about 10 seconds in, I am photobombed by the pet rat. Well, no, the Coypu. It's still wandering around by it's lonesome. I wonder why it got kicked out of the pond group? Did it admit to voting Brexit?
As it was a sunny day (mostly), the bugs came out. The black things that make it look like an Olde Timey Ciné Filme are crows if on the grass, or otherwise either flies or masonry bees. The bright sun made the colours quite vivid. In the afternoon it came over hazy which made everything a sort of used-looking washed out blah. This shows up in the video. I'd have liked to have had the sun and shadows all day, but I don't get to control the weather.
The pictures are exactly as recorded by the camera. Asides from sunrise and sunset, it did a reasonable job of having consistent colours.
Im my past article on the subject, David suggested Could look at overall brightness of an image - just sum all the pixel values and then decide whether to take another one with a different exposure setting. Unfortunately the ESP32 is limited in memory. It only has about 320 KiB of SRAM on the chip, and anything else is sent to a serial-interface (thus not so quick) PSRAM chip that is usually around 4MiB in size, and this is used for the camera image buffering.
Because of this, the camera is usually told to provide the images in JPEG format. That is to say, the camera module itself converts the image into a JPEG as it is pulling pixel data from the imager, and it is this JPEG that is retrieved from the camera and dropped into the PSRAM.
As such, there isn't really any way to access the individual pixels of the image. And because of the behaviour with different frame sizes, it isn't really possible to step down to a smaller frame size to read the raw data (as the so-called face detection does) because it uses every fourth pixel when at CIF or below, it uses every other pixel for VGA and SVGA, and it uses every pixel for anything higher than SVGA.
Due to this, colours look a bit washed out at VGA and SVGA, and pretty lousy at CIF or lower. So if we were to read a CIF image, whatever values we arrive at will not bear much resemblance to those of the full size image.
To put this into context, I took three successive pictures with the camera pointing out the front window (at ten past seven in the evening on a cloudy day). Using the spravg2 program (written for John Williams' Pic_Index), I did a quick test of each of these pictures.
Resolution
Pixels used
Average colour
UXGA 1600×1200
Every one
&697962
SVGA 800×600
Akin to every other
&91918E
CIF 400×296
Akin to every fourth
&838781
The average of all of the pixels looks grey because the smaller pictures are washed out. It's a murky green for full size because it's a mix of the grey/off-white of the window frame, and the green of the grass out front.
Bear in mind, this is the same picture taken at the same time.
Because of this, any corrections would need to be "done in post". Which is easier said than done. Best to just assume that it will struggle in low light (the brightness shifts in late evening are the AEC stepping) and in very low light (coming from/going to night) it might not be entirely sure if the scene should be blue or green as the AWB has no reference point.
Do remember, always, that the ESP32-CAM board and camera cost barely more than a Happy Meal. It's pretty damn good for the price. ☺
A quick look at the Bayer filter
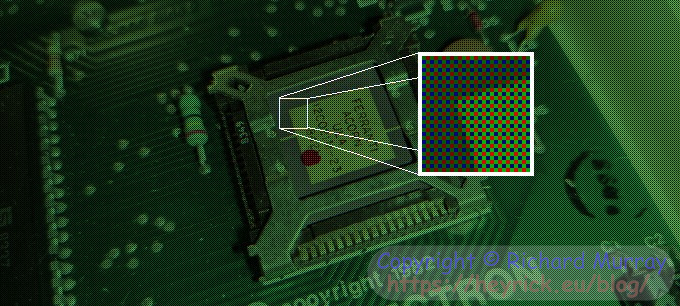
To look at the pixel matrix in more detail, this is how the image sensor pixels are arranged in full resolution.
Every pixel in use.
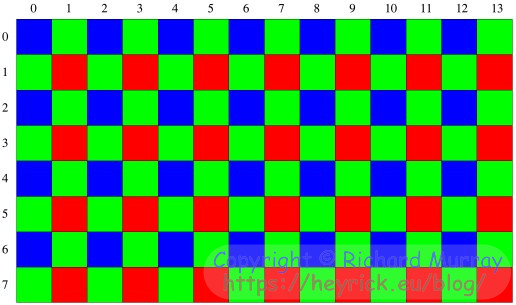
As you can see, the camera doesn't actually receive a full colour picture. What the camera actually sees looks like this, with the bit in the white box zoomed so you can better visualise what is happening.
Bayer image.
Every pixel has a valid luminance, or brightness, value. But each pixel can only see red or green or blue. There are twice as many green because the eye is most sensitive to greens, so the camera needs greater green fidelity.
Armed with this information, the camera will interpolate to spread around the colour values to determine the most appropriate RGB colour value for each individual pixel. It isn't always correct, but variations of this process have been doing a pretty good job of fooling us for about two decades (far more if you want to consider the chroma signal of analogue TV! ☺). Suffice to say, there isn't a camera sensor with individual pixels that are equally sensitive to all visual frequencies. In situations where resolution is the most important thing, one uses a set of mirrors to direct the light being received to three different imager elements, one for each of the primary colours. Early colour broadcast cameras did this, and some (rather expensive) domestic video cameras, however it was the only way to get a full resolution colour image as each of the imagers would provide it's own red, green, and blue values and they can simply be merged together to determine what the actual colour is.
But for the vast majority of regular domestic cameras, it's something like this.
What is being described here is a simple Bayer matrix. There are numerous variations used by different cameras in order to achieve the best colour reproduction (such as red, green, blue, emerald; or different filter layouts (pixel arrangements or shapes).
Also, there are different algorithms such as treating each colour channel separately rather than averaging them all together.
Just a quick side note. If you were to remove the Bayer filter from the imager, the camera would be a high resolution monochrome camera (an easy 4× gain in actual resolution). Don't bother trying this with your OV2640, as you'd need a reasonably professional camera that can save raw data files, otherwise you'll have the camera's firmware messing things up as it valiantly tries to interpolate colours from information it no longer has...
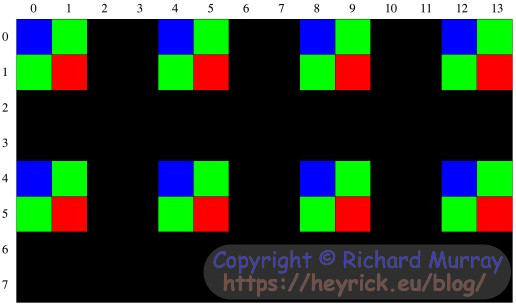
When using VGA and SVGA resolution, the camera uses this pixel arrangement. It's not quite every other pixel, but it is effectively the same thing. Perhaps it is electrically easier to do it this way?
Every other pixel in use.
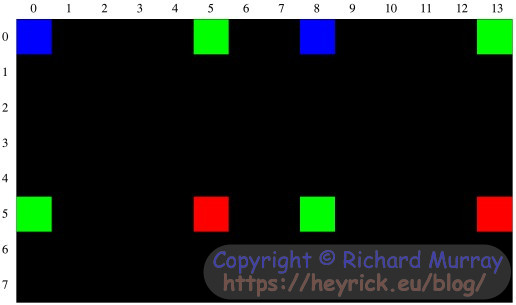
And, finally, with the tiny (CIF and below) resolutions, the camera uses what is closer to every fourth pixel. It's not quite due to how the pixels are arranged, but you can see it's a lot less of the imager in use. It does not read the entire array and average or anything clever like that.
Every fourth pixel in use.
Okay, time to go make something "soft" to eat. Linguini sounds nice...
Your comments:
Please note that while I check this page every so often, I am not able to control what users write; therefore I disclaim all liability for unpleasant and/or infringing and/or defamatory material. Undesired content will be removed as soon as it is noticed. By leaving a comment, you agree not to post material that is illegal or in bad taste, and you should be aware that the time and your IP address are both recorded, should it be necessary to find out who you are. Oh, and don't bother trying to inline HTML. I'm not that stupid! ☺ ADDING COMMENTS DOES NOT WORK IF READING TRANSLATED VERSIONS.
You can now follow comment additions with the comment RSS feed. This is distinct from the b.log RSS feed, so you can subscribe to one or both as you wish.
VinceH, 12th April 2023, 00:15
I have quite a nice view from my window, and I've long liked the idea of setting up a camera to time lapse it - though ideally over a longer period. (Bonus, I spotted the other week that a lot of new trees have been planted).
I haven't done so, though, because my main camera doesn't do time lapses, so I'd have to get something suitable, set it all up, etc.
But I've just realised I already have something; a couple of cheap indoor (network) security cameras. Probably a couple of decades old, and likely to be insecure, but they can save to an FTP location - so with care and suitable protective measures, I could use one (or even both) of those.
It'll have to wait (not at home this week + Wakefield fast approaching + lots of new work) but as soon as practical, I'll see if I can find them, plus suitable wall warts, and experiment.
David Pilling, 12th April 2023, 13:06
Interesting - so we're in the land where the processor memory is small compared to the image. That is obvious for things like the ATMega Arduinos, but I'd not taken it in for the ESP32. It is interesting the camera does the compression and also nice that you've got details of how the pixel colours are arranged.
Purely for the fun of thinking it, add a tuppeney light sensor, give the ESP ADC something to do. I suspect one could look at a JPEG file in compressed form and work out the brightness. Or JPEGs are made of little blocks, so big JPEG to thumbnail size JPEG without any expansion and then expand the little JPEG.
A huge amount of effort has gone into finding the best way of converting the Bayer data to RGB. Expensive professional cameras use the same arrangement, or at least did 10 years back. Once I had a demo version of a Japanese RAW conversion program (silkypix), and it could pick out details from my photos that others could not.
If you really had to produce a better quality timelapse, buying a better camera would be the most cost effective route.
When I was doing timelapse around 2012 I scored a Canon Powershot on ebay for 10 quid and I am still using it as a handy camera.
(the firmware in the compact Canon cameras has been 'hacked' (see CHDK) and there are lots of extensions, including programming laguages (lua))
This web page is licenced for your personal, private, non-commercial use only. No automated processing by advertising systems is permitted.
RIPA notice: No consent is given for interception of page transmission.